Showing posts with label front-end. Show all posts

Tuesday, December 1, 2020

Distributed caching in ASP.NET Core using Redis, MongoDB and Docker

Redis is the world's most popular caching database. Let's review how to implement distributed caching in ASP.NET Core using Redis, MongoDB and Docker Compose.
Photo by Christian Nielsen on Unsplash

One of the things that every modern website needs is caching. After all, we don't want to be alerted at 2AM being informed that our services are down because we had a spike in usage which our databases couldn't handle.

One common solution to reducing the stress in our applications is placing a fast caching service between our website and our database. Modern caching implementations include requirements around decreasing response time, distributed caching (sharing the same cache between multiple web instances) and cost reduction. Most implementations today use Redis (a super-fast an in-memory key–value database) as a cache service sitting in front of a database of choice.

On this post we will implement a fictional ASP.NET Core e-commerce website using MongoDB as database and Redis as a cache service, both running on Docker with Docker Compose so that we can understand how it all works together.

On this post we will:
  • Scaffold an ASP.NET Core website
  • Implement a catalog service using MongoDB
  • Implement distributed caching using Redis
  • Run our dependencies using Docker Compose
  • Setup Redis Commander and Mongo Express to view/manage our services

Setting up an ASP.NET Core website

Let's quickly scaffold an ASP.NET Core website using the command line with:
dotnet new mvc -n AspNetDistributedCaching
Then, add the below configuration to your appsettings.json file:
  "Mongo": {
    "ConnectionString": "mongodb://localhost:27017",
    "Db": "catalog",
    "Collection": "products"
  },
  "Redis": {
    "Configuration": "localhost",
    "InstanceName": "web"
  }
Next, add the config classes and bind these configs. In case you missed, feel free to review how configurations work in ASP.NET Core 3.1 projects on a previous article.

Setting up dependencies

Let's now setup our dependencies: Redis, MongoDB and the management interfaces  Redis Commander and Mongo Express. Despite sounding complicated, it's actually very simple if we use the right tools: Docker and Docker Compose.

Docker Compose 101

Without much extension, let me briefly re-introduce Docker Compose:
Compose is a tool for defining and running multi-container Docker applications. With Compose, you use a YAML file to configure your application’s services. Then, with a single command, you create and start all the services from your configuration. See the list of features.
Setting Compose in your project is actually very simple. For starters, paste this on a docker-compose.yml file on the root of the project. We'll add the services and their respective configurations next:
version: '3.7'
services:
  # we'll add our services on the next steps

Configuring our MongoDB instance

Next, let's configure MongoDB. Paste the snippet below at the bottom of your docker-compose.yml file. It will instruct Compose to init a Mongo instance called catalog-db and initialize the catalog database from the ./db.js file:
  catalog-db:
    image: mongo
    environment:
      # MONGO_INITDB_ROOT_USERNAME: root
      # MONGO_INITDB_ROOT_PASSWORD: todo
      MONGO_INITDB_DATABASE: catalog
    volumes:
    - .db.js:/docker-entrypoint-initdb.d/db.js:ro
    expose:
      - "27017"     ports:
      - "3301:27017"

Configuring our Redis instance

As with MongoDB, let's now setup our Redis cache. Paste this at the bottom of your docker-compose.yml file:
  redis:
    image: redis:6-alpine
    expose:
      - "6379"
    ports:
      - "6379:6379"

Configuring  the Management interfaces

Let's now setup management interfaces for Redis - Redis Commander and Mongo - Mongo Express to access our resources (I'll show later how do you use them). Again, paste the below on your docker-compose.yml file:
  # Mongo Express: tool to manage our Mongo database
  mongo-express:
    image: mongo-express
    restart: always
    ports:
      - "8011:8081"
    environment:
      - ME_CONFIG_MONGODB_SERVER=catalog-db
      # MONGO_INITDB_ROOT_USERNAME: root
      # MONGO_INITDB_ROOT_PASSWORD: todo
    depends_on:
      - catalog-db

  # Redis Commander: tool to manage our Redis container from localhost
  redis-commander:
    image: rediscommander/redis-commander:latest
    environment:
      - REDIS_HOSTS=redis
    ports:
      - "8013:8081"
    depends_on:
      - redis

Querying Catalog Data

Obviously in order to cache the data, we should have it first. So let's implement a simple MongoDB wrapper using the Repository Pattern which I'll call CatalogRepository. Its interface looks like:
public interface ICatalogRepository
{
    Task<IList<Category>> GetCategories();
    Task<Category> GetCategory(string slug);
    Task<Product> GetProduct(string slug);
    Task<IList<Product>> GetProductsByCategory(string slug);
}
For the concrete implemtation, don't forget to add the MongoDB.Driver NuGet Package. I show a simple query below. To view it in full, check this demo's repo:
public async Task<IList<Category>> GetCategories()
{
    var c = _db.GetCollection<Category>("categories");
    return (await c.FindAsync(new BsonDocument())).ToList();
}
Next, let's set up DI for this guy using ASP.NET's DI framework:
services.AddTransient<ICatalogRepository, CatalogRepository>();
To view the code in full, check it on this demo's repo at github.com/hd9/aspnet-distributed-caching.

Caching Catalog Data

With the repository working, let's implement the caching. I'll divide this task in:
  1. setting up Redis with distributed caching
  2. implementing a Service class and
  3. adding the caching logic to the service class.

Setting up the Redis Initialization

First, add NuGet references to Microsoft.Extensions.DependencyInjection. and Microsoft.Extensions.Caching.StackExchangeRedis. Then add the add a call to services.AddStackExchangeRedisCache in ConfigureServices:
services.AddStackExchangeRedisCache(o =>
{
    o.Configuration = cfg.Redis.Configuration;
    o.InstanceName = cfg.Redis.InstanceName;
});

Implementing a Service Class

The next part consists of implementing the caching logic. Such logic will live in CatalogService which implements the service design pattern and abstracts from the Controller either the repository and the caching implementations. Its first important part is the constructor which looks like this:
public CatalogSvc(
    ICatalogRepository repo,
    IDistributedCache cache)
{
    _repo = repo;
    _cache = cache;
}

Adding the caching logic

Then, every method of the above interface are similarly implemented. For example, the GetCategories method that feeds the landing page looks like this:
public async Task<IList<Category>> GetCategories()
{
    return await GetFromCache<IList<Category>>(
        "categories",
        "*",
        async () => await _repo.GetCategories());
}
And our GetFromCache private method that generalizes caching logic for our catalog service looks like:
private async Task<TResult> GetFromCache<TResult>(
    string key,
    string val,
    Func<Task<object>> func)
{
    var cacheKey = string.Format(_keyFmt, key, val);
    var data = await _cache.GetStringAsync(cacheKey);

    if (string.IsNullOrEmpty(data))
    {
        data = JsonConvert.SerializeObject(await func());

        await _cache.SetStringAsync(
            cacheKey,
            data);
    }

    return JsonConvert.
        DeserializeObject<TResult>(data);
}
The interesting bits of the above piece of code is that before searching the database (which's abstracted by a Func<> parameter), it searches the cache with GetStringAsync. If it finds, it returns the cached data cast as the provided type (TResult) by deserializing it from its string value. In case the cache key is not present, it will invoke the target function and cache its result as a Json string in the Redis cache.

To use it, first we wire it up to the DI container:
services.AddTransient<ICatalogSvc, CatalogSvc>();
So we can properly inject it and use it in our controllers:
public HomeController(ICatalogSvc svc)
{
    _svc = svc;
}

Management Interfaces

To finish up, let's quickly review how to access the management interfaces for Redis and Mongo Express.

Accessing Mongo Express

To view/modify your catalog, you can access Mongo Express at: http://localhost:8011/. I changed from the original port 8081 to 8011 since many services run on that port and if it was your case, Compose would fail. But feel free to change that configuration on your docker-compose.yml file. As previously mentioned, this database is auto-initialized from the db.js file by Docker Compose. Here's a quick glance of Mongo Express displaying our catalog data:

Accessing Redis Commander

Redis Commander is a frontend for vieweing and managing Redis. On this demo I run it on http://localhost:8011/. As previously, feel free to change the port on your docker-compose.yml file. Here's Redis Commander showing our cached data:

Running the Services

The last part is to describe how to run the services. As a .NET developer, you're already used to debug and run your solutions with Visual Studio - the same applies here. The only thing that remains is how to run the dependencies? As mentioned, it's as simple as running the below command from the project's root with Docker Compose:
docker-compose up
You should see the services starting in the backend similar to this:
To shutdown, run:
docker-compose down
Finally, to remove everything, run:
docker-compose down -v

Final Thoughts

On this article we reviewed how to use Redis, a super-fast key-value document database in front of MongoDB database serving as a distributed service. On this example we still leveraged Docker and Docker Compose to simplify the setup and the initialization of our project so we could get our application running and test it as quickly as possible.

Redis is one of the world's most used and loved databases and a very common option for caching. I hope you also realized how Docker and Docker Compose help developers by simplifying rebuilding complex environments like this.

Source Code

As always, the source code for this article is available on my GitHub.

References

Monday, July 27, 2020

Send emails from ASP.NET Core websites using SendGrid and Azure

Today we have multiple free options to send email from our apps. Let's review how to configure and use SendGrid and Azure to send emails from our ASP.NET Core apps and benefit from their extraordinary free plan.
Photo by Carol Jeng on Unsplash

Long are the days that we had to use Gmail App Passwords to send and test emails from our apps. Today we have a plethora of alternatives that cost nothing or close to nothing. On that category, SendGrid offers Azure subscribers 25,000 free emails per month! So let's review how to setup a free SendGrid account and build a simple ASP.NET website to send emails from it.

On this post we will:
  • create a SendGrid account directly in Azure
  • build a simple ASP.NET Core web app and review how to properly configure it
  • access and configure our SendGrid settings in SendGrid
  • send emails using SMTP (not the RESTful API) from our console application
For a quick start, download the code from GitHub at: github.com/hd9/aspnet-sendgrid

Creating a SendGrid account in Azure

The good news is that in case you don't have one already, you can create a SendGrid account directly from Azure. Let's get straight to it. Open your Azure portal and type sendgrid on the search tool bar and click on SendGrid Accounts:
Click Add to create our account from Azure:
Enter your information on the next screen:
Review and confirm your package:
Wait until your deployment completes (it should take no more than 10 seconds). Now go back to SendGrid Accounts and you should see your new account there:
Clicking on it would take you to the SendGrid pane showing you essential information about your new resource:
Did you notice that Manage button? Clicking that button will take us directly to SendGrid where we'll be able to configure out account, create api keys, monitor our usage and a lot more.

I won't expand much in what SendGrid offers (tldr; a lot!). For more of that, feel free to visit their website.

Configuring SendGrid

The first time you login to SendGrid, you'll be requested to confirm your email address. After confirmation, this is the what you should see a screen similar to the below, showing you a general overview of your account:

Creating our SMTP API Key

To be able to send emails from SendGrid, we'll have first to generate a password. First click on Settings -> API Keys:
Choose Restricted Access:

Select Mail Send (for this demo we only need that one):

And click create. You'll be presented with your password (api key). Copy it safely:

SendGrid Configuration

With the password in hand, here's a summary about the configuration we'll need:
  • Host: smtp.sendgrid.net
  • Port: 587
  • Username: apikey
  • Password: SG.zGNcZ-**********************

Building our App

I guess that at this point, creating an ASP.NET web app is no surprise to anyone. But if you're new to .NET Core, please check this documentation on how to build and run ASP.NET Core on Linux. It's a different perspective from the Visual Studio-centric approach you'll see elsewhere. To quickly create with VS, File -> Create a new project and select Web Application (Model-View-Controller).

Configuring our App

With the configuration in hand, let's now review how to use it. To simplify things, I built already a simple web app that captures 2 fields: name and email of a potential newsletter subscriber. It looks like this and is available on GitHub:
Apart from the visual, there are a couple of things on this app that are worth looking into. Let's start with the configuration. If you open appsettings.json on the root of the project you will see:
  "SmtpOptions": {
    "Host": "<smtp>",
    "Port": "587",
    "Username": "<account>",
    "Password": "<password>",
    "FromName": "<from-name>",
    "FromEmail": "<from-email>",
    "EmailOverride": "<email>"
  },
  "EmailTemplate": {
    "Subject": "[HildenCo WebStore] Welcome to our newsletter!",
    "Body": "Hello {0},\nThanks for signing up for our newsletter!\n\nBest Regards,\nHildenCo."
  }

Since I already explained how to bind that config to a class of our own, I'll not extend too much on the topic. Essentially we will:
  • map the SmtpOptions configuration into a SmtpOptions class
  • map the EmailTemplate config into the EmailConfig class
That mapping is done elegantly by the framework as this line from Startup.cs shows:
cfg = configuration.Get<AppConfig>();
Inspecting cfg during debug confirms the successful binding:

Dependency Injection

Next, it's time to setup dependency injection. For our objective here, ASP.NET's default DependencyInjection utility is good enough. Put the below in your ConfigureServices method to wire everything up:
services.AddSingleton(cfg.SmtpOptions);
services.AddSingleton(cfg.EmailTemplate);
services.AddTransient<IMailSender, MailSender>();
Next, inject the dependencies needed by our Controller and our MailSender classes:
readonly IMailSender _mailSender;
readonly ILogger<HomeController> _logger;

public HomeController(
    IMailSender mailSender,
    ILogger<HomeController> logger)
{
    _logger = logger;
    _mailSender = mailSender;
}

Invoking SendMail from our controller

To call MailSender from our controller, simply inject a SendMail command into and invoke it:
await _mailSender.Send(new SendMail
{
    Name = signup.Name,
    Email = signup.Email
});

Our MailSender class

To finish, here's an excerpt of our MailSender class (see the full source on GitHub):
// init our smtp client
var smtpClient = new SmtpClient
{
    Host = _smtpOptions.Host,
    Port = _smtpOptions.Port,
    EnableSsl = true,
    DeliveryMethod = SmtpDeliveryMethod.Network,
    UseDefaultCredentials = false,
    Credentials = new NetworkCredential(_smtpOptions.Username, _smtpOptions.Password)
};
// init our mail message
var mail = new MailMessage
{
    From = new MailAddress(_smtpOptions.FromEmail, _smtpOptions.FromName),
    Subject = _tpl.Subject,
    Body = string.Format(_tpl.Body, msg)
};
// send the message
await smtpClient.SendMailAsync(mail);

Testing the App

Run the app with Visual Studio 2019, enter a name and an email address. If all's configured correctly, you should soon get an email in your inbox:
As well as SendGrid reporting a successful delivery:

Final Thoughts

The only remaining question is why SMTP? The advantages of using SMTP instead of the API is that SMTP is a pretty standard protocol, works with .NET's primitives, works with any programming language or framework and, contrary to the restful API, does not require any specific packages. SMTP also works well with containers, but I'll leave that fore a future post. 😉

Conclusion

On this tutorial we reviewed how to create a SendGrid account directly from Azure, we demoed how to configure it so we can send emails from our applications. SendGrid is a great email service with a very powerful API that I recommend exploring and learning other topics such as creating your own templates, using webhooks, etc. On the future we'll revisit this example to send email from our own ASP.NET containers in a microservice application. Keep tuned!

Source Code

As always, the source is available on GitHub.

References

See Also

Monday, February 3, 2020

How to enable ASP.NET error pages using Azure Serial Console

It's possible to enable ASP.NET error pages on Azure by using the new Azure Serial Console. Let's see how.
By default, ASP.NET web applications running on a remote server set the customErrors property to "RemoteOnly". That means that, unless you're running on the local server, you won't be able to view the original error and the stack trace related it. And that's a good thing! A lot of successful hacks derive from understanding the exception messages and working around them.

But what if you're testing a new server, a new deployment process or just released a new feature and need to enable the error pages very quickly? Well, if you're using Azure, you can use Azure Serial Console to do the job. No SSHing, no RDPing or uploading of configurations to the remote environment. Let's see how.

Azure Serial Console

Today we will use Azure Serial Console. According to Microsoft:
The Serial Console in the Azure portal provides access to a text-based console for virtual machines (VMs) and virtual machine scale set instances running either Linux or Windows. This serial connection connects to the ttyS0 or COM1 serial port of the VM or virtual machine scale set instance, providing access independent of the network or operating system state. The serial console can only be accessed by using the Azure portal and is allowed only for those users who have an access role of Contributor or higher to the VM or virtual machine scale set.
In other words, Azure Serial Console is a nice, simple and accessible tool that can be run from the Azure portal allowing us to interact with our cloud resources including our Azure App Services.

Accessing the console

To access the console for your web application, first we find our Azure App Service in the Portal by clicking on App Services:
Selecting the web site we want to open:
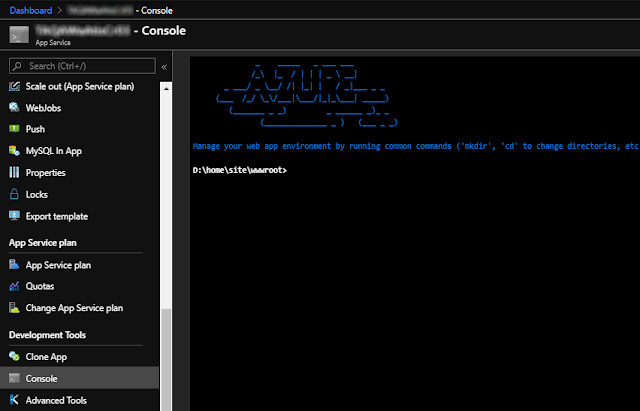
And click on Console on the Development Tools section. You should then see a shell similar to:

Using the Console

Now the fun part. We are ready to interact with our App Service directly from that shell. For starters, let's get some help:
The above screenshot shows some of the administrative commands available on the system. Most of them are standard DOS command prompt utilities that you probably used on your Windows box but never cared to learn. So what can we do?

Linux Tools on Azure Serial Console

Turns out that Redmond is bending to the accessibility, ubiquity and to the power of POSIX / open source tools used and loved by system administrators such as ls, diff, cat, ps, more, less, echo, grep, sed and others. So before jumping to the solution, let's review what we can do with some of these tools.
Example 1: a better dir with ls
Example 2: Creatting and appending content to files using echo, pipes and cat
Example 3: getting disk information with df
Example 4: viewing mounted partitions with mount
Example 5: Displaying differences between files using diff
Example 6: Getting kernel information using uname
Example 7: Even curl and scp is available!

Disabling Custom Errors

Okay, back to our problem. If you know some ASP.NET, you know that the trick is to modify the customErrors Element (ASP.NET Settings Schema) and set the property to   Off   . So let's see how we can change that configuration using a command line tool.

Backing up

Obviously we want to backup our web.config. I hope that's obvious with:
cp web.config web.config.orig

Using sed to replace configuration

Now, we will use sed (a tool available on the GNU operating system that Linux hackers can't live without) to change the setting directly from the console. I'm a sed geek and use it extensively in a Hugo project I've been working on (thousands of markdown files). Together with Go, the i3 window manager, Vim, ranger and grep, my Fedora workstation becomes an ideal development environment. Now, back to .NET...

Testing the Patch

We can safely test if our changes will work by typing:
sed 's/RemoteOnly/Off' web.config

Applying the Patch

Let's jump right to how to replace our customErrors element from   RemoteOnly   to   Off   ? The solution is this simple one-liner script:
sed -i 's/RemoteOnly/Off/' web.config

Switching Back

Now, obviously we may want to switch back. That's why it was important to backup your web.config before. We can switch back by replacing the changed web.config with the original:
rm web.config
mv web.config.orig web.config
Or by running sed again, this time with the parameters inverted:
sed -i 's/Off/RemoteOnly/' web.config

Security Considerations

I hope I don't need to repeat that it's unsafe to leave error pages off on your cloud services. Even if they are simply a playground, there are risks of malicious users pivoting to different services (like your database) and accessing confidential data. Please disable them as soon as possible.

What about Kudu?

Yes, Azure Kudu allows editing files on a remote Azure App Service by using a WISIWYG editor. However, we can't count on that always, everywhere. Remember, with the transition to a microservice-based architecture, more and more our apps will run on serverless and containerized environments meaning tools like that wouldn't be available. So the tip presented on this post will definitely stand the test of time! 😉

Final Thoughts

Wow, that seems a long post for such a small hack but I felt the need to stress certain things here:
  1. Developers shouldn't be afraid to use the terminal - I see this pattern especially with Microsoft developers assuming that there should always be a button to do something. The more you use the terminal, the more confident you'll be with the tools you're using regardless of where you are. 
  2. Microsoft is moving towards Linux and you should too - The GNU tools prove an unimaginable asset to know. Once you know how to use them better, you'll realize that your toolset grows and you get more creative getting things faster. Plus, the ability to pipe output between them yields unlimited possibilities. Don't know where to start? WSL is the best way to learn the Linux on Windows 10.
  3. Be creative, use the best tool for the job - choose wise the tool you use. Very frequently the command line is the fastest (and quickest) way to accomplish most of the automatic workflow. And it can be automated!

Conclusion

The Azure Serial Console can be a powerful tool to help you manage, inspect, debug and run quick commands against your Azure App Service and your Virtual Machines. And combined with the Linux tools it becomes even more powerful!

And you, what's your favorite hack?

References

See Also

Monday, January 28, 2019

A simple chat room in Vue.Js

Let's see how to build a simple chat-room using Vue.Js and why Vue.js is awesome.

Vue.Js is awesome. I've used other JavaScript libs throughout the years and as a long time Scrum master and developer, I use to do a technical retrospective after each project. In my experience, when compared to Vue.Js, other libs are heavy, slow or  over-complicated. Just do a quick search to learn why people love it.

On this post, I want to demo how elegant and simple Vue is so I built a very simple chat room frontend using Vue.js, Bootstrap and a few CDNs. You can find the source code here. It's one simple html page. Just download and open in your browser.

The source code

You can find the code for a simple chat room below. A little more then 30 lines of code to build this frontend. Wow, that's efficiency.


Posting Messages to the Room

Of course, we would like to send messages to the chat room. It's as simple as running the code below on your Developer Tools (F12) console:
app.messages.push({name: 'Some Name', msg: 'Test123', tm: (new Date()).toLocaleTimeString(), color: 'red'});
See that new messages are auto-added to the room on the bottom with very little effort. Simple, clean, elegant.

Future Enhancements

Out of the box, the code above simulates a chat room frontend for just one user. Yes you can still hack it trough the console to add other users (by pushing to the participants array) but it's not usable yet. One interesting exercise would be enhancing the above code with WebSockets so that multiple users can connect at the same room and chat trough it.

I already have that code written in SignalR Core and a ASP.NET Core web app as the backend and will soon open source it. Stay tuned.

Source Code

Vue did all the work. All the rest is available on my GitHub.

See Also

Monday, July 2, 2018

Building a dynamic table with Vue.Js and Bootstrap 4

Vue.js makes it easy to manipulate the DOM and build dynamic elements. Read to understand.

You probably had that requirement to build tables where the user can Edit/Remove/Add items to it dynamically. With jQuery that required handling a lot of events usually leading to bugs and wasted time. Turns out that with Vue.Js, if modeled correctly, that's extremely easy. Let's take a look.

Adding Bootstrap 4

First, to make it look cool and save us some time prepping html, css and layout stuff, let's use Bootstrap's starter template to save us some dev time building the base html page.

Save that file and add Vue's dev version from the cdn on the bottom of the file with:

    <!-- Vue development version, includes helpful console warnings -->
    <script src="https://cdn.jsdelivr.net/npm/vue/dist/vue.js"></script>

With Bootstrap and Vue loaded, let's do some code.

Building the Vue Instance

My agenda class below will be responsible for rendering the dynamic table. Its syntax looks like this:
        const agenda = new Vue({
            el: '#agenda',
            data: {
                topics: [
                    new Topic({ title: 'Item 1' }),
                    new Topic({ title: 'Item 2' }),
                    new Topic({ title: 'Item 3' }),
                ]
            },
            computed: {

            },
            methods: {
                add() {
                    this.topics.push(new Topic({ editing: true }))
                },
                save() {
                    alert("todo :: submit to server");
                },
                cancelEdits() {
                    this.topics.forEach(el => el.editing = false );
                }
            }
        });

That represents our Vue instance, the start point of our Vue app. See how simple it is? That's the beauty of Vue. Now let's revise our Topic class. Our agenda app consists of a table of a list of topics in which each row is an instance of the Topic class described below:

        const Topic = function(model){
            var self = this;
            var m = model || {};
            
            self.oTitle = m.title || "";
            self.title = m.title;
            self.required = m.required || false;
            self.orequired = self.required;
            self.editing = m.editing;

            self.update = function(i){
                if ((self.title || "").length < 3){
                    alert('At least 3 chars are required to save');
                    return;
                }

                agenda.topics[i].title = self.title;
                self.editing = false;
            }

            self.edit = function(){
                agenda.cancelEdits();
                self.editing = true;
            }

            self.cancel = function(i){
                if (!self.oTitle){
                    agenda.topics.splice(i,1);
                    return;
                }

                self.title = self.oTitle;
                self.required = self.orequired;
                self.editing = false;
            }

            self.remove = function(i){
                if (confirm('Are you sure you want to remove this topic?')){
                    agenda.topics.splice(i,1);
                }
            }
            
            return self;
        }

Reviewing the HTML

The part of the HTML that deserves some comment is how we dynamically list the records using Vue's v-for directive binding. The code below shows how this is accomplished elegantly using Vue:
    <tr v-for="(t, i) in topics">

So, for each element in agenda.topics, Vue will render a tr for us with this piece of code:

<tr v-for="(t, i) in topics">
                    <th scope="row">{{ i + 1 }}</th>
                    <td>
                        <span v-if="t.editing">
                            <input v-model="t.title" @@keyup.enter="t.update(i)"/>
                        </span>
                        <span v-else>
                            {{ t.title }}
                        </span>
                    </td>
                    <td class="text-center">
                        <span v-if="t.editing">
                            <input type="radio" value="true" v-model="t.required"> Yes
                            <input type="radio" value="false" v-model="t.required"> No
                        </span>
                        <span v-else>
                            {{ t.required == "true" ? 'Yes' : 'No' }}
                        </span>
                    </td>
                    <td class="text-center">
                        <span v-if="t.editing">
                            <button class="btn btn-outline-info btn-sm" v-on:click="t.update(i)">Update</button>
                            <button class="btn btn-outline-danger btn-sm" v-on:click="t.cancel(i)">Cancel</button>
                        </span>
                        <span v-else>
                            <button class="btn btn-outline-info btn-sm" v-on:click="t.edit(i)">Edit</button>
                            <button class="btn btn-outline-danger btn-sm" v-on:click="t.remove(i)">Remove</button>
                        </span>
                    </td>
                </tr>

The source code for this page is available on my GitHub repo

Conclusion

The objective of this post is to demo how simple things become when using the right tools. Vue in my experience has matured and deserves a lot of praise in how it handles reactivity, simplifies, organizes and accelerates development.

See Also

About the Author

Bruno Hildenbrand      
Principal Architect, HildenCo Solutions.