Showing posts with label FOSS. Show all posts

Monday, February 3, 2020

How to enable ASP.NET error pages using Azure Serial Console

It's possible to enable ASP.NET error pages on Azure by using the new Azure Serial Console. Let's see how.
By default, ASP.NET web applications running on a remote server set the customErrors property to "RemoteOnly". That means that, unless you're running on the local server, you won't be able to view the original error and the stack trace related it. And that's a good thing! A lot of successful hacks derive from understanding the exception messages and working around them.

But what if you're testing a new server, a new deployment process or just released a new feature and need to enable the error pages very quickly? Well, if you're using Azure, you can use Azure Serial Console to do the job. No SSHing, no RDPing or uploading of configurations to the remote environment. Let's see how.

Azure Serial Console

Today we will use Azure Serial Console. According to Microsoft:
The Serial Console in the Azure portal provides access to a text-based console for virtual machines (VMs) and virtual machine scale set instances running either Linux or Windows. This serial connection connects to the ttyS0 or COM1 serial port of the VM or virtual machine scale set instance, providing access independent of the network or operating system state. The serial console can only be accessed by using the Azure portal and is allowed only for those users who have an access role of Contributor or higher to the VM or virtual machine scale set.
In other words, Azure Serial Console is a nice, simple and accessible tool that can be run from the Azure portal allowing us to interact with our cloud resources including our Azure App Services.

Accessing the console

To access the console for your web application, first we find our Azure App Service in the Portal by clicking on App Services:
Selecting the web site we want to open:
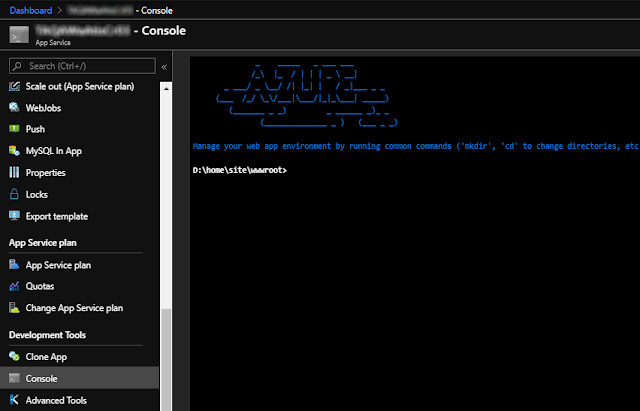
And click on Console on the Development Tools section. You should then see a shell similar to:

Using the Console

Now the fun part. We are ready to interact with our App Service directly from that shell. For starters, let's get some help:
The above screenshot shows some of the administrative commands available on the system. Most of them are standard DOS command prompt utilities that you probably used on your Windows box but never cared to learn. So what can we do?

Linux Tools on Azure Serial Console

Turns out that Redmond is bending to the accessibility, ubiquity and to the power of POSIX / open source tools used and loved by system administrators such as ls, diff, cat, ps, more, less, echo, grep, sed and others. So before jumping to the solution, let's review what we can do with some of these tools.
Example 1: a better dir with ls
Example 2: Creatting and appending content to files using echo, pipes and cat
Example 3: getting disk information with df
Example 4: viewing mounted partitions with mount
Example 5: Displaying differences between files using diff
Example 6: Getting kernel information using uname
Example 7: Even curl and scp is available!

Disabling Custom Errors

Okay, back to our problem. If you know some ASP.NET, you know that the trick is to modify the customErrors Element (ASP.NET Settings Schema) and set the property to   Off   . So let's see how we can change that configuration using a command line tool.

Backing up

Obviously we want to backup our web.config. I hope that's obvious with:
cp web.config web.config.orig

Using sed to replace configuration

Now, we will use sed (a tool available on the GNU operating system that Linux hackers can't live without) to change the setting directly from the console. I'm a sed geek and use it extensively in a Hugo project I've been working on (thousands of markdown files). Together with Go, the i3 window manager, Vim, ranger and grep, my Fedora workstation becomes an ideal development environment. Now, back to .NET...

Testing the Patch

We can safely test if our changes will work by typing:
sed 's/RemoteOnly/Off' web.config

Applying the Patch

Let's jump right to how to replace our customErrors element from   RemoteOnly   to   Off   ? The solution is this simple one-liner script:
sed -i 's/RemoteOnly/Off/' web.config

Switching Back

Now, obviously we may want to switch back. That's why it was important to backup your web.config before. We can switch back by replacing the changed web.config with the original:
rm web.config
mv web.config.orig web.config
Or by running sed again, this time with the parameters inverted:
sed -i 's/Off/RemoteOnly/' web.config

Security Considerations

I hope I don't need to repeat that it's unsafe to leave error pages off on your cloud services. Even if they are simply a playground, there are risks of malicious users pivoting to different services (like your database) and accessing confidential data. Please disable them as soon as possible.

What about Kudu?

Yes, Azure Kudu allows editing files on a remote Azure App Service by using a WISIWYG editor. However, we can't count on that always, everywhere. Remember, with the transition to a microservice-based architecture, more and more our apps will run on serverless and containerized environments meaning tools like that wouldn't be available. So the tip presented on this post will definitely stand the test of time! 😉

Final Thoughts

Wow, that seems a long post for such a small hack but I felt the need to stress certain things here:
  1. Developers shouldn't be afraid to use the terminal - I see this pattern especially with Microsoft developers assuming that there should always be a button to do something. The more you use the terminal, the more confident you'll be with the tools you're using regardless of where you are. 
  2. Microsoft is moving towards Linux and you should too - The GNU tools prove an unimaginable asset to know. Once you know how to use them better, you'll realize that your toolset grows and you get more creative getting things faster. Plus, the ability to pipe output between them yields unlimited possibilities. Don't know where to start? WSL is the best way to learn the Linux on Windows 10.
  3. Be creative, use the best tool for the job - choose wise the tool you use. Very frequently the command line is the fastest (and quickest) way to accomplish most of the automatic workflow. And it can be automated!

Conclusion

The Azure Serial Console can be a powerful tool to help you manage, inspect, debug and run quick commands against your Azure App Service and your Virtual Machines. And combined with the Linux tools it becomes even more powerful!

And you, what's your favorite hack?

References

See Also

Monday, January 6, 2020

Countdown to .NET 5

2020 is an excellent year for .NET. This is the year we'll finally see .NET 5 merging .NET Core, .NET Framework and Xamarin.
2020 brings great news for .NET developers. This is the year that, Microsoft expects to consolidate .NET Core and .NET Framework on a single platform called .NET 5 including .NET mobile (Xamarin), ASP.NET Core, Entity Framework Core, WinForms, WPF and ML.NET.. The first preview is expected in the first half of the year with the official release foretasted for Nov, 2020. Excited? You should be!

Update: The first beta release is available now!

Great news for .NET developers

That's great news for folks working on .NET Core since there'll be an influx of projects to work, contribute and develop. But that's even better news for teams working on slow-moving projects (aka, most of us) which have been deferring an update to the more modern, faster and container-friendly .NET Core.

I posted some time ago my insights regarding this update. TLDR, I'm super excited! Being a long time Fedora Linux user and a big open source enthusiast, I have been using .NET Core for my personal projects on Linux (and running them successfully on both Docker, AWS and Azure). While I'm transitioning more and more my workflow to open source software (such as Vim, i3, etc) and and have been working a decent portion of my time with Go and Python, .NET is still my default framework.

So let's take another look at what's coming up next with .NET.

Highlights of .NET 5

Apart from the single codebase, my preferred highlights of .NET 5 are:
  • .NET will become a single platform including Xamarin, ASP.NET Core, Entity Framework Core, WinForms, WPF and ML.NET
  • Unified .NET SDK experience:
    • Single BCL (Base Class Library) across all .NET 5 applications. Today Xamarin applications use the Mono BCL but will move to use the.NET Core BCL, improving compatibility across our application models.
    • Mobile development (Xamarin) is integrated into .NET 5. This means the .NET SDK will support mobile. For example, you can use “dotnet new XamarinForms” to create a mobile application.
  • Native Applications supporting multiple platforms: Single Device project that supports an application that can work across multiple devices for example Window Desktop, Microsoft Duo (Android), and iOS using the native controls supported on those platforms.
  • Cloud Native Applications: High performance, single file (.exe) <50MB microservices and support for building multiple project (API, web front ends, containers) both locally and in the cloud.
  • Open source and hosted on GitHub
  • Cross-platform and better performance
  • Decent command-line interface (CLI)
  • Java, Objective-C and Swift interoperability
  • Support of static compilation of .NET (ahead-of-time – AOT)
  • Smaller footprints

A Unified Platform

This is a more holistic view of what .NET 5 will be:

The Schedule

The proposed merge is expected to happen by November 2020. Here's the plan:
You can also check the release status in real time on GitHub (Jan, 2020):

What's Next

So what's next? Well, the best thing to do is to keep an eye on .NET's official blog as they'll be updating the status of the project through there. Would you like to contribute? Jump into .NET Core and CoreFx repositories in GitHub. For more information on the topic, consider reading .NET Core and .NET merging as .NET 5.0.

References

See Also

For more posts on .NET Core, please click here.

Monday, August 5, 2019

How I fell in love with i3

Understand what i3 is and how it can drastically change how you use your Linux desktop.

I've been using the i3 window manager for a couple of years and would like to share some thoughts about it. But first let's understand what i3 is and how it can drastically change how you use your Linux desktop.

What is i3?

The official documentation describes i3 as:
a tilingwindow manager, completely written from scratch. The target platforms are GNU/Linux and BSD operating systems, our code is Free and Open Source Software (FOSS) under the BSD license. i3 is primarily targeted at advanced users and developers.
But what's a tiling window manager?

Tiling Window Managers

A tiling window manager is a program that runs on top of your operating system's graphical user interface (GUI) that auto-manages your windows for you. The most common way users interact with their computers these days is via desktop mangers (GNOME, KDE, XFCE, etc). That same program includes tools to set wallpapers, login managers, drag and move windows around and interact with other running windows and services.
Source: DevianArt

Differences

So what are the differences between a tiling window manager and a desktop manager? Many. For simplicity, tiling window managers:
  • are way simpler than full desktop managers
  • consume way less resources
  • require you to setup most things yourself
  • auto-place windows on the desktop
  • automatically split window space
  • do not allow dragging or moving windows around
  • always use 100% of the allocated space
  • are easily customizable
  • allow managing desktop applications using the keyboard
  • can be configured to pre-load specific configurations

Why i3

Working with i3 may be a radical shift in how we use our computers, so why should one switch from traditional desktop environments like Gnome, KDE, MATE, Cinnamon to i3? In summary, you should consider i3 because i3:
  • will make you more productive
  • is simple, concise
  • is lightweight
  • is fast, super fast
  • is not bloated, not fancy (but can be)
  • is extremely customizable allowing you to configure it the way you like
  • reduces context switching, saving you time and brain power since you will stop wasting time dragging and searching for windows around
  • allows you to manage your workspace entirely using the keyboard
  • has vim-like keybindings (yes, this is a plus!!)
  • has easy support for vertical and horizontal splits, and parent containers. 
  • improves your battery life
  • can integrate with other tools of your system
  • will make you feel less tired after a day of work
  • will make you learn better the GNU/Linux operating system
  • will make you more the terminal and terminal-based tools
So let's review some of the main reasons to switch to i3.

A Beautiful Desktop

i3 will make your desktop beautiful. Through its simplicity you will discover a more uniform and elegant experience. For example, take a look at this beautiful Arch desktop running i3. See how all applications integrate seamlessly. No overridden windows, no pixels wasted.
Source: Reddit

Productivity

My productivity increased significantly using i3. Why? Because it's keyboard-friendly nature made me stopped using the mouse significantly. Yes, I still have to use the it but now I try to keep that to a minimum. Today, 90% of my work can be easily accomplished via keystrokes.
Source: Reddit

Efficiency

On traditional desktop environments spend a lot of time dragging windows around and alt-tabbing between them. i3 saves hundreds of alt-tabs and hand-right-hand-left movements to reach the mouse. That's a lot of context switch saved, and a lot of efficiency gained!

Less Fatigue

i3 will also reduce your fatigue. Why? Arm right, Arm left, that involuntary movement we do thousands of times a day to reach the mouse adds a lot of fatigue to our body and it's one of the main reasons we feel exhausted after using the computer for a day. With i3, you'll keep your hands on the home row of my keyboard and move less your arms to achieve the tasks you need. You'll probably feel less tired after a day of work on my Fedora at home than after a couple of hours on Windows.

Highly Customizable

Unless you're super minimalist, you will like customize your i3. There are a lot of tutorials out there and I urge you pick some specific for your distro. In general people add a different color scheme, change icons, fonts, the toolbar, and the Gnome theme when applicable. Some examples can seen here.
Source: Reddit
Source: Reddit

The i3 configuration is simple to read, understand, share and modify. Don't like that keybinding? Change your ~/.config/i3/config file and do your changes. For example, here are some of my custom bindings:

Easy to get started

i3 is available on repositories for Fedora, Ubuntu, Arch and other major distros. That said, installation should be straightforward by using your package manager (see below). After you start i3 the first time, you are prompted for an initial configuration that will set the basics for you to get rolling.
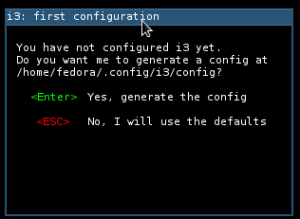
After installation, you'll be prompted with this screen on your first login

Compatible with GNOME/KDE tools

Be assured that you will still use all your GUI applications with i3. Firefox, Chromium, Calculator, Nautilus, Gnome settings or Gimp, everything should be available and accessible trough the default  dmenu.
Source: https://i3wm.org/screenshots/

You will use more the terminal

I realized that with i3 I've been using more and more the terminal. I replaced most of the visual GUI applications with tools like:
  • system management: systemctl, dnf, journalct, etc
  • networking: nmcli, ifconfig, iwconfig, netstat, etc
  • process management: top, htop, etc
  • text editor: Vim
  • text manipulation: sed, awk
  • search: fzf, find, grep
  • file management: ranger, xargs

You may not realize but once you memorize the commands and rely less on the mouse and on graphical applications which by design are less feature-rich, you will become more confident using your system, improve and accelerate your workflow. Then you learn more and repeat the cycle.

You will learn new tools

You will also learn new tools. And because you'll be using more and more the terminal, you will probably change your whole workflow and realize you'll be more productive using the terminal. For example, these are the tools I'm using more and more:
  • Vim - my main text editor. Adheres very well to the i3 workflow.
  • Mutt - not perfect but very decent email client for the terminal
  • Ranger - a fantastic file management for the terminal!
  • rtv - Reddit on the terminal
  • w3m/lynx/links - Terminal-based web browsers
  • Tmux - essential with WSL and on a SSH session. But not a strong requirement for i3 users
  • fzf - fantastic command line fuzzer. Also available as a fzf.vim plugin
  • Grep - powerful search from the command line
  • Awk, Sed - utilities manipulate streams

Better performance, less memory

Computational performance is like free beer, we never say no =). GNOME was already fast on my notebook but i3 makes it even faster. Add to that less memory consumption (my system running i3 utilizes around 400Mb of memory, while GNOME consumes 1GB) and you realize how performant your machine be! And it gets even better with old hardware paired with XFCE, LXDE or LXQT.

You will learn more about Linux

Using i3 made me learn and know more about the Linux system and the GNU tools. Because I drastically shifted how I do my work on my Linux box to using tools such as grep, Vim, Tmux, ranger and mutt. I've also stopped and finally learned how to work well with sed, awk, systemd, firewalld, networkd, auditctl and lots of other system tools that I never bothered with.

Installing i3

If you sympathized with i3, let's see how to install it.

Installing on Fedora

sudo dnf install i3 i3status dmenu i3lock xbacklight feh conky

Installing on Ubuntu

sudo apt update
sudo apt install i3

Logging in

Assuming the installation was successful, logout and before logging in, remember to change the toggle to use i3:

Source: Fedora Magazine
On your first login, you should be presented with this screen that will automatically generate a configuration for your user:

Next Steps

The best way to get started with i3 (and its sibling Sway) is of course, by using Fedora. The community has produced two spins with the basic setups called Fedora i3 Spin and Fedora Sway Spin. Please check those pages for more information.

Test it on a VM

Once you read the documentation, I'd recommend to install it on the VM hypervisor of your choice. (Hyper-V, VirtualBox or VMware workstation are the most popular). Please git yourself some time to familiarize yourself with the proposal before giving up.

Read the docs

The first thing you should do is read and understand well the documentation. i3's official documentation is also an excellent resource and very well documented. YouTube, GitHub and the i3wm community on Reddit are also great resources to get started and learn how to tweak your setup.

Get used

Once you're comfortable with the setup, consider doing some of these:

  • Get used to using the <mod>+enter to start your terminal
  • Map applications you use the most i3 bindings (see Customization above for some examples)
  • Configure your toolbar to add/remove information you need
  • Keep learning more about i3. Use it for some time before removing removing it if you're struggling. 
  • Once you start getting comfortable with it, start replacing GUI-based applications for TUI-based applications (those that run on the terminal)
  • Consider changing your workflow to optimize repetitive actions (using aliases for example)
  • Continue learning and tweaking your config files until you're productivity goes up

Tweak

Next, feel free to tweak i3 as much as you need! In case the defaults don't appeal to you (probably they won't), remember, you can always change. For example, it's simple to switch the defaults to:
  • change the toolbar: i3blocks or polybar
  • add padding between tiles (windows): i3-gaps
  • add fancy UI transitions with compton
  • enhance your desktop background: conky, feh
  • replace your application launcher: rofi

Conclusion

Let me be clear: i3 is not for everyone. If you're a mouse person, if you don't like to spend time configuring your desktop, learning new tools, using the terminal, don't bother with i3. Linux desktop environments are amazing and have everything that a user already needs out of the box.

But, if you want to be more productive, learn better your Linux system, configure your system as you want, I would urge you to try i3. Set aside some time to learn the default key bindings, learn how to configure it and use it for a couple of weeks. Don't give up before that. Let your muscle memory work 😉.

See Also
Monday, July 15, 2019

Diagnosing and Fixing WSL initialization issues

After uninstalling ZSH from my Ubuntu WSL instance, my system wouldn't start. How to fix it? Let's take a look.

I was recently testing the ZSH shell on my WSL instance and decided to make it default. After removing it with Apt my WSL instance suddenly wouldn't start up. After investigating, I realized that WSL was failing to start a session for my user using a now nonexistent ZSH shell. Strangely enough, Apt/Ubuntu ignored that my system still had references to that shell. My expectation is that it would have reverted the user sessions back to bash what didn't happen.

In case you're interested, here's how to reproduce the error:

  1. Install a new shell to your user (ex. zsh)
  2. Set it to your default (for example by using chsh but the zsh install script already does so)
  3. Uninstall that shell
But before we jump to the solution, it's important to understand some how WSL works in the background.

WSL Background

WSL is run by Windows as the wsl.exe executable file located on c:\windows\system32. That executable bootstraps the whole Linux subsystem on your machine using files located on your Windows disk. Knowing where the files used by your WSL instance are located is a good start to troubleshooting. On my machine, they're found on:
C:\Users\<my-user>\AppData\Local\Packages\CanonicalGroupLimited.UbuntuonWindows_79rhkp1fndgsc\LocalState\rootfs
On yours, it could be equal or very similar. Definitely on your user's AppData\Local\Packages folder.

Fixing the Issue

Because wsl.exe is an executable, we can run it on the console. In order to do so, open a windows terminal and:
  1. cd into c:\windows\system32 
  2. run wsl --help 
You should then see a generic help for your instance:
However if WSL is broken any additional information will not be output on the console. So, it's important to have some context on the issue before we can fix it. On my particular case, since I knew my default shell (ZSH) was failing to load, to fix the issue I just had to change my user's shell to bash as the root user. That's as simple as:
  1. log in WSL as root
  2. As root, use chsh to change your user's shell

Logging in as Root from the Terminal in WSL

To login as root from the terminal, simply run the following command:
C:\Windows\System32>wsl -u root

Changing the User shell with chsh

Next we change the shell using chsh. chsh is a GNU utility created to chang the user shell. After logged in as root, one simply has to run the command:
chsh -s /bin/bash bruno

Testing

To test, you either have to close WSL (^D) and reopen it or as root, ron run su <user> on the current shell:
su bruno

Final Thoughts

Despite WSL not emitting much information on failures, it's important to remember that there's still a Linux system behind it. Knowing Linux or searching Linux related articles could help.It's also important to remember that, because all the filesystem is located on your C drive, you still have access to logs/config files and could try to fix from there if necessary.

References

See Also

For more posts about WSL on this blog, please click here.

Monday, July 1, 2019

How to create a Ubuntu Desktop on Azure

We have multiple Linux offerings on Azure for the server but none for the desktop. How can we build one hassle-free?

Photo by XPS on Unsplash

Azure offers a variety of Linux servers including RHEL, CentOS, Debian and Ubuntu. But no desktop. As developers, it would be nice to have access to a development VM on the cloud with a GUI and software like Visual Studio Code and Chrome.

On this post, let's see how to install the necessary software to transform an Ubuntu server into a functional Ubuntu desktop including the necessary procedures to RDP into it from Windows, Mac and Linux.

What we will do

On this tutorial we will install the following tools:
If you need Visual Studio Code, please follow this tutorial.

Creating the Instance

The base image for our desktop will be Ubuntu Server 18.04 LTS. As this is a server image, it doesn't contain a GUI. We will install it ourselves as long as a browser and a tool to connect remotely via RDP. By default we can connect to it via SSH using our WSL or Putty. In Azure, click "Create a Resource" then select Ubuntu Server 18.04 LTS.

When this post was created 18.04 was the last LTS but now we have 20.04. Feel free to use it if you prefer. The steps are exactly the same!

Configuring the VM

Now let's configure the VM. Here we will set the username, password, VM name, resource group, region, etc that are adequate to you. For example, my configuration is show below:

Setting up Disks

The next step is disk setup. I selected Premium SSD with 10GB as seen below:

Setting up the Network

For the network interface, I created a new VNet/Subnet and requested a new IP. Note that the IP will only be available to us after creation. You also need to open inbound ports for SSH (22) and RDP (3389) as we'll need them later to access our instance remotely later: 

Review and Create

Review and if everything's correct, click on Create to proceed:
After a couple of minutes the instance should be created and running.

Connecting to our Instance

Once our instance is deployed, let's connect to it. Depending on how you configured during creation, it can be accessed via username/password or via SSH. You should use Azure's overview window to get important information as IP address and username.

To access it, click the Connect tab from where you should see:

Because I configured ssh and uploaded my ssh key, I simply have to open my WSL and enter the following command:
# connect to my remote server using ssh
ssh bruno@<my-ip>
This is the output of my first connection to that VM:
If you chose to provide an username/password during creation, you're still good to connect via SSH. The only difference is that you'll have to provide your password upon connection.

Diagnosing Connection Issues

If for some reason you get:

ssh: connect to host 13.66.228.253 port 22: Resource temporarily unavailable
it's because the port 22 (SSH) is not open for connection externally. And that's a good thing! It pretty much tells us that our connection is being blocked by a firewall. By default in Azure, VMs are wrapped into a Network Service Group (NSG) which is an extra layer of protection to our cloud artifacts. It basically provides full control over traffic that ingresses or egresses a virtual machine in a VNet.

In order to expose that port, click on the Networking tab to change the inbound rules:
To add a new one, we click the Add inbound port rule button and enter the rule as below:

Security Considerations

Please note that it's recommended that you only expose ports that are essentially necessary to to security threats. In our example, we should only expose ports 22 (SSH) and 3389 (RDP). It's also recommended to configure your NSG to restrict access to your IP only.

Once that's done, try to connect again with:

# connect to my remote server using SSH
ssh bruno@<my-ip>

Installing the Required Tools

With the VM up and running and with SSH access to it, it's time to install the required tools to make our server more user friendly. Remember, we'll have to install a desktop manager, some CLI tools and Firefox.

Updating the system

The first thing to do should be updating the system and the list of packages available to your Ubuntu instance with:
# Updating the package Sources
sudo apt update && sudo apt upgrade -y

Installing the CLI tools

The next step is to install useful CLI tools to work (some of them are already pre-installed with the Azure/Ubuntu image):
# install basic terminal tools
sudo apt install tmux git ranger vim

Installing LXDE

Now, let's install our desktop (LXDE). The good news is that Canonical, the good folks behind Ubuntu, already provide a metapackage called lubuntu-desktop that contains not only LXDE but Firefox and other very useful GNOME tools. We install it using the following command:
sudo apt install lubuntu-desktop -y
Please note that this installation take a while as ~2GB of files have to be downloaded and installed on your server.

Setting up Xrdp

The last and final step is to install Xrdp. As previously mentioned, this tool is required to connect to our instance using RDP. This installation downloads ~8Mb and runs very quickly after the above commands. Type the following on the shell:
# install xrdp
sudo apt install xrdp -y
Next step is to start the xrdp service so we can connect to it via RDP.
# start the xrdp service
sudo systemctl start xrdp

Connecting via RDP

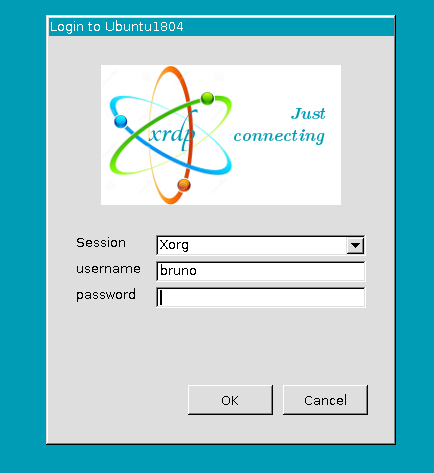
All should be good to go now so let's try to connect to our machine. Simply enter the IP address on the RDP information and hit connect. On mine, I got the prompt:
Note that if when creating your VM on Azure you selected SSH, you have to setup a new password for your user. This is done with:
# setting up a new password for our user
sudo passwd bruno

LXDE 

If you enter your password correctly, you should login to your LXDE session. This is my awesome LXDE session running on Azure. By clicking on the blue icon above you'll have access to all the software included with the metapackage:

Persisting Changes

What happens after a reboot? Will the VM still run Xrdp? No. Unless we make the service permanent. If that's what you want, do that by running the below command on the terminal:
# permanently enable the Xrdp service during boot
sudo systemctl enable xrdp

Final Thoughts

The cloud is an awesome environment to test new things out. On this example I used Azure but you could reproduce pretty much everything here on your cloud provider of choice. It's also important to remember that two of the most fundamental aspects of a Linux system are customization and extensibility. So, installing/changing a GUI, trying out different software, adding/removing repos, etc should be simple on the cloud as is on a local VM. And that shouldn't prevent us from being creative and using our imagination.

I encourage you to play with Azure or your preferred cloud provider and experiment not only with a Ubuntu Linux VM but other operating systems. It's all a few clicks away and a fantastic learning experience!

References

See Also

Wednesday, June 26, 2019

The Raspberry Pi 4 is here!

In a surprising move, the Raspberry Pi foundation announced the much-anticipated Raspberry Pi 4. See why it matters.
Wow! The Raspberry Pi Foundation just announced the Raspberry Pi with awesome additions. With the new hardware, the desktop experience should be even smoother. Plus, it includes support for optionally more memory, 4k displays, USB-C, gigabit ethernet, Raspbian updates and more, much more.

UPDATE: The Raspberry Pi foundation just announced a Raspberry Pi 4 with 8GB of RAM! Read more here.

What's New

In summary, this is what stands out in this release:
  • Updated ARM Cpu. Now 1.5GHz Arm
  • Updated Ram size (1GB, 2GB, 4GB and 8GB)
  • Two new USB 3 ports
  • 4-bit BCM2711 quad-core A72 CPU @ 1.5GHz
  • VideoCore VI GPU
  • Gigabit Ethernet port
  • Support for 4k displays
  • Dual-band WiFi supporting both 2.4GHz and 5GHz
  • Double-HDMI - so now you can connect two monitors
  • Powered by a USB Type C
  • Bluetooth 5.0
  • Audio – 4-pole stereo audio and composite video port

Why the Raspberry Pi is matters

Before going forward, let's review why the Pi is important.
  • it runs Linux
  • it's super cheap
  • it's an excellent computer for kids
  • it's excellent for teaching computing kids
  • it's an excellent alternative to the Chrome OS
  • it can be a VPN server
  • it can be a gaming machine
  • it can be used for robotics
  • it can interface with Arduino trough its GPIO header
  • it's an excellent opportunity to learn Linux
  • And so much more!

Physical Computing

The PI allows us to interface with the external world (called physical computing) with its GPIO header. It's basically a standard 40 pin I/O that you can use to read/send electric signals to LEDs, motors, sensors, etc. With it we can build all sorts of things including robots.

It's perfect for kids

Either being their first PC (as in personal computer, not as in Windows) or an upgrade, I think that Pi's are perfect for kids.

Why? We could for example teach them:
  • basics of computing with MIT's Scratch language
  • linux - so they grow up used to the best OS in the world
  • python programming
  • game development using python and pydev
  • arts and image manipulation with GIMP

It's can be a gaming console

Yes, you could install Retropie on it and load your ROMs into it. Just plug some controllers and you're ready to go.

It can be a hub to learn computing

This is one my favourites. One could use the Pi to learn Python, programming, game development, physical computing and so much more. The Pi is also an excellent introduction to free/open source software and to Linux in general.

It can be a Media Center 

Speaking of sharing, you could use the Pi as your media center using Kodi for example.. So all your videos could be shared between devices connected on the same network.

It's could be for a personal VPN

The Pi has a very low power consumption which makes it a great always-on VPN server. Trough it you'll get secure access to your home network when you're on the go and can use it for secure web browsing when you're on public networks.

It could be a personal File server

You could turn your Pi into a file server to back up and share content from anywhere on your local network. That way, you could share with everyone connected to your home network access all your files potentially hosted on that old external drive.

It could be a Web Server

Yes! If you don't believe, check this article out on how the Raspberri Pi foundation built its website running on a cluster of Pi's handling record load. Very interesting read.

It runs Linux

This Raspberry Pi 4's operating system, Raspbian was updated from a major Debian release, Buster. Buster brings a few user interface tweaks and a whole host of software upgrades, including Python 3.7.

It could replace your old computer

Yes! We've been waiting for nice ARM computers for some time now. Turns out that the Pi 4 has enough specs to be considered as an entry-level computer. The Pi 4 also supports dual monitors and comes with USB 3.0 interface collaborating with faster external storage access.

Pricing and availability

This is the best part. The pricing for just the Raspberry Pi 4 board starts from $35 and depending on the choice of RAM (1-4 GB) as detailed below:
  • Raspberry Pi 4 with 1 GB RAM: $35 USD
  • Raspberry Pi 4 with 2 GB RAM: $45 35 USD
  • Raspberry Pi 4 with 4 GB RAM: $55 USD
  • Raspberry Pi 4 with 4 GB RAM: $75 USD (New!) - Read the official announcement

Performance

By the specs, it's clear that the Pi 4 is way better than the previous generations. But how much? This beautiful post from Gareth Halfacree provides a lot of details on it. Allow me to show what stood out to me:
Source
Source
Source

The official announcement

The announcement video from the Pi Foundation summarizing some of the changes can be seen below

Final Thoughts

The Pi has always amazed me. Being a fan of physical computing and having both a Pi and an Arduino, I'm so excited to see the recent improvements with the Pi that I'm planning to by one for my kids and one for me to test out different use cases. Plus, we the excellent performance, the Pi now not only serves as a small server but as a very capable GNU/Linux desktop system.

And you, have you considered the Pi yet?

References

See Also

For more posts about Linux on this blog, please click here.

About the Author

Bruno Hildenbrand      
Principal Architect, HildenCo Solutions.