I've been using the
i3 window manager for a couple of years and would like to share some thoughts about it. But first let's understand what i3 is and how it can drastically change how you use your Linux desktop.
What is i3?
The official documentation describes i3 as:
a tilingwindow manager, completely written from scratch. The target platforms are
GNU/Linux and BSD operating systems, our code is Free and Open Source Software
(FOSS) under the BSD license. i3 is primarily targeted at advanced users and
developers.
But what's a tiling window manager?
Tiling Window Managers
A
tiling window manager is a program that runs on top of your operating system's
graphical user interface (GUI) that auto-manages your windows for you. The most common way users interact with their computers these days is via
desktop mangers (
GNOME,
KDE,
XFCE, etc). That same program includes tools to set wallpapers, login managers, drag and move windows around and interact with other running windows and services.
Differences
So what are the differences between a tiling window manager and a desktop manager? Many. For simplicity, tiling window managers:
- are way simpler than full desktop managers
- consume way less resources
- require you to setup most things yourself
- auto-place windows on the desktop
- automatically split window space
- do not allow dragging or moving windows around
- always use 100% of the allocated space
- are easily customizable
- allow managing desktop applications using the keyboard
- can be configured to pre-load specific configurations
Why i3
Working with i3 may be a radical shift in how we use our computers, so why should one switch from traditional desktop environments like
Gnome,
KDE,
MATE,
Cinnamon to i3? In summary, you should consider i3 because i3:
- will make you more productive
- is simple, concise
- is lightweight
- is fast, super fast
- is not bloated, not fancy (but can be)
- is extremely customizable allowing you to configure it the way you like
- reduces context switching, saving you time and brain power since you will stop wasting time dragging and searching for windows around
- allows you to manage your workspace entirely using the keyboard
- has vim-like keybindings (yes, this is a plus!!)
- has easy support for vertical and horizontal splits, and parent containers.
- improves your battery life
- can integrate with other tools of your system
- will make you feel less tired after a day of work
- will make you learn better the GNU/Linux operating system
- will make you more the terminal and terminal-based tools
So let's review some of the main reasons to switch to i3.
A Beautiful Desktop
i3 will make your desktop beautiful. Through its simplicity you will discover a more uniform and elegant experience. For example, take a look at this beautiful
Arch desktop running i3. See how all applications integrate seamlessly. No overridden windows, no pixels wasted.
Productivity
My productivity increased significantly using i3. Why? Because it's keyboard-friendly nature made me stopped using the mouse significantly. Yes, I still have to use the it but now I try to keep that to a minimum. Today, 90% of my work can be easily accomplished via keystrokes.
Efficiency
On traditional desktop environments spend a lot of time dragging windows around and
alt-tabbing between them. i3 saves hundreds of alt-tabs and
hand-right-hand-left movements to reach the mouse. That's a lot of
context switch saved, and a lot of efficiency gained!
Less Fatigue
i3 will also reduce your fatigue. Why?
Arm right, Arm left, that involuntary movement we do thousands of times a day to reach the mouse adds a lot of fatigue to our body and it's one of the main reasons we feel exhausted after using the computer for a day. With i3, you'll keep your hands on
the home row of my keyboard and move less your arms to achieve the tasks you need. You'll probably feel less tired after a day of work on
my Fedora at home than after a couple of hours on Windows.
Highly Customizable
Unless you're super
minimalist, you will like customize your i3. There are a lot of
tutorials out there and I urge you pick some specific for your distro.
In general people add a different color
scheme, change icons, fonts, the toolbar, and the Gnome theme when applicable. Some examples can seen
here.
The i3 configuration is simple to read, understand, share and modify. Don't like that keybinding? Change your
~/.config/i3/config file and do your changes. For example, here are some of my custom bindings:
Easy to get started
i3 is available on repositories for
Fedora,
Ubuntu,
Arch and other major distros. That said, installation should be straightforward by using your
package manager (see below). After you start i3 the first time, you are prompted for an initial configuration that will set the basics for you to get rolling.
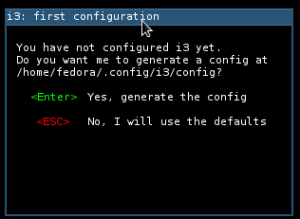 |
| After installation, you'll be prompted with this screen on your first login |
Compatible with GNOME/KDE tools
Be assured that you will still use all your GUI applications with i3. Firefox, Chromium, Calculator, Nautilus, Gnome settings or Gimp, everything should be available and accessible trough the
default dmenu.
You will use more the terminal
I realized that with i3 I've been using more and more the terminal. I replaced most of the visual GUI applications with tools like:
- system management: systemctl, dnf, journalct, etc
- networking: nmcli, ifconfig, iwconfig, netstat, etc
- process management: top, htop, etc
- text editor: Vim
- text manipulation: sed, awk
- search: fzf, find, grep
- file management: ranger, xargs
You may not realize but once you memorize the commands and rely less on the mouse and on graphical applications which by design are less feature-rich, you will become more confident using your system, improve and accelerate your workflow. Then you learn more and repeat the cycle.
You will learn new tools
You will also learn new tools. And because you'll be using more and more the terminal, you will probably change your whole workflow and realize you'll be more productive using the terminal. For example, these are the tools I'm using more and more:
- Vim - my main text editor. Adheres very well to the i3 workflow.
- Mutt - not perfect but very decent email client for the terminal
- Ranger - a fantastic file management for the terminal!
- rtv - Reddit on the terminal
- w3m/lynx/links - Terminal-based web browsers
- Tmux - essential with WSL and on a SSH session. But not a strong requirement for i3 users
- fzf - fantastic command line fuzzer. Also available as a fzf.vim plugin
- Grep - powerful search from the command line
- Awk, Sed - utilities manipulate streams
Better performance, less memory
Computational performance is like free beer, we never say no =). GNOME was already fast on my notebook but i3 makes it even faster. Add to that less memory consumption (my system running i3 utilizes around 400Mb of memory, while GNOME consumes 1GB) and you realize how performant your machine be! And it gets even better with old hardware paired with
XFCE,
LXDE or
LXQT.
You will learn more about Linux
Using i3 made me learn and know more about the Linux system and the
GNU tools. Because I drastically shifted how I do my work on my Linux box to using tools such as grep,
Vim,
Tmux,
ranger and mutt. I've also stopped and finally learned how to work well with
sed,
awk,
systemd, firewalld, networkd,
auditctl and lots of other system tools that I never bothered with.
Installing i3
If you sympathized with i3, let's see how to install it.
Installing on Fedora
sudo dnf install i3 i3status dmenu i3lock xbacklight feh conky
Installing on Ubuntu
sudo apt update
sudo apt install i3
Logging in
Assuming the installation was successful, logout and before logging in, remember to change the toggle to use i3:
On your first login, you should be presented with this screen that will automatically generate a configuration for your user:
Next Steps
The best way to get started with i3 (and its sibling Sway) is of course, by using Fedora. The community has produced two spins with the basic setups called Fedora i3 Spin and Fedora Sway Spin. Please check those pages for more information.
Test it on a VM
Once you read the documentation, I'd recommend to install it on the VM hypervisor of your choice. (Hyper-V, VirtualBox or VMware workstation are the most popular). Please git yourself some time to familiarize yourself with the proposal before giving up.
Read the docs
The first thing you should do is read and understand well the documentation.
i3's official documentation is also an excellent resource and very well documented.
YouTube,
GitHub and the
i3wm community on Reddit are also great resources to get started and learn how to tweak your setup.
Get used
Once you're comfortable with the setup, consider doing some of these:
- Get used to using the <mod>+enter to start your terminal
- Map applications you use the most i3 bindings (see Customization above for some examples)
- Configure your toolbar to add/remove information you need
- Keep learning more about i3. Use it for some time before removing removing it if you're struggling.
- Once you start getting comfortable with it, start replacing GUI-based applications for TUI-based applications (those that run on the terminal)
- Consider changing your workflow to optimize repetitive actions (using aliases for example)
- Continue learning and tweaking your config files until you're productivity goes up
Tweak
Next, feel free to tweak i3 as much as you need! In case the defaults don't appeal to you (probably they won't),
remember, you can always change. For example, it's simple to switch the
defaults to:
- change the toolbar: i3blocks or polybar
- add padding between tiles (windows): i3-gaps
- add fancy UI transitions with compton
- enhance your desktop background: conky, feh
- replace your application launcher: rofi
Conclusion
Let me be clear: i3 is not for everyone. If you're a
mouse person, if you don't like to spend time configuring your desktop,
learning new tools, using the terminal, don't bother with i3. Linux
desktop environments are amazing and have everything that a user already needs out of the box.
But, if you want to
be more productive, learn better your Linux system, configure your
system as you want, I would urge you to try i3. Set aside some time to
learn the default key bindings, learn how to configure it and use it for
a couple of weeks. Don't give up before that. Let your muscle memory
work 😉.
See Also


