 |
| Photo by XPS on Unsplash |
Azure offers a variety of Linux servers including RHEL, CentOS, Debian and Ubuntu. But no desktop. As developers, it would be nice to have access to a development VM on the cloud with a GUI and software like Visual Studio Code and Chrome.
What we will do
On this tutorial we will install the following tools:- LXDE, a lightweight desktop manager so we can interact with our VM using a GUI.
- Xrdp - to connect to it remotely using RDP.
- A browser - Chromium or Firefox from the default repos.
- Command line tools of your choice. I like having tmux, git, Vim and Ranger.
Creating the Instance
The base image for our desktop will be Ubuntu Server 18.04 LTS. As this is a server image, it doesn't contain a GUI. We will install it ourselves as long as a browser and a tool to connect remotely via RDP. By default we can connect to it via SSH using our WSL or Putty. In Azure, click "Create a Resource" then select Ubuntu Server 18.04 LTS.
Configuring the VM
Now let's configure the VM. Here we will set the username, password, VM name, resource group, region, etc that are adequate to you. For example, my configuration is show below: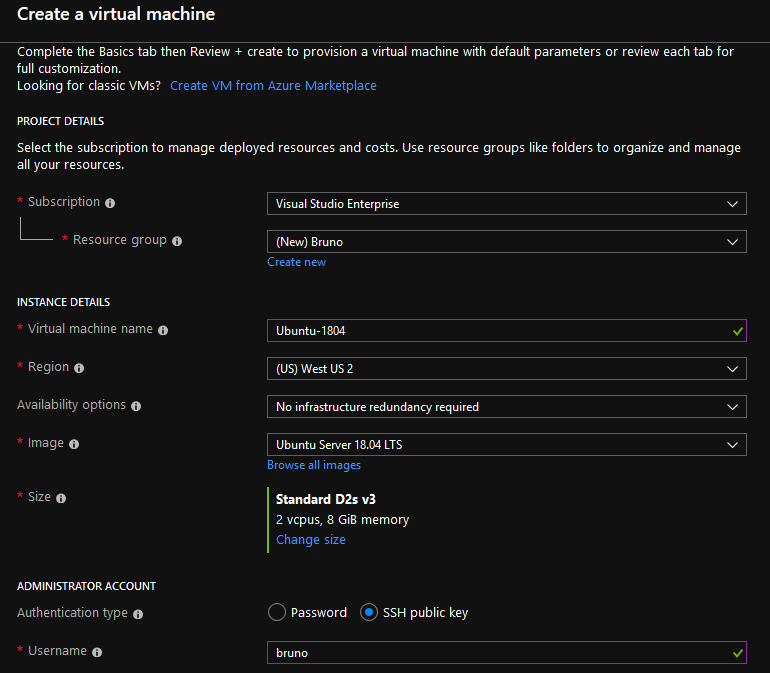
Setting up Disks
The next step is disk setup. I selected Premium SSD with 10GB as seen below:
Setting up the Network
For the network interface, I created a new VNet/Subnet and requested a new IP. Note that the IP will only be available to us after creation. You also need to open inbound ports for SSH (22) and RDP (3389) as we'll need them later to access our instance remotely later:
Review and Create
Review and if everything's correct, click on Create to proceed:
Connecting to our Instance
Once our instance is deployed, let's connect to it. Depending on how you configured during creation, it can be accessed via username/password or via SSH. You should use Azure's overview window to get important information as IP address and username.
To access it, click the Connect tab from where you should see:

ssh bruno@<my-ip>

Diagnosing Connection Issues
If for some reason you get:
In order to expose that port, click on the Networking tab to change the inbound rules:


Security Considerations
Please note that it's recommended that you only expose ports that are essentially necessary to to security threats. In our example, we should only expose ports 22 (SSH) and 3389 (RDP). It's also recommended to configure your NSG to restrict access to your IP only.
Once that's done, try to connect again with:
ssh bruno@<my-ip>
Installing the Required Tools
With the VM up and running and with SSH access to it, it's time to install the required tools to make our server more user friendly. Remember, we'll have to install a desktop manager, some CLI tools and Firefox.Updating the system
The first thing to do should be updating the system and the list of packages available to your Ubuntu instance with:sudo apt update && sudo apt upgrade -y
Installing the CLI tools
The next step is to install useful CLI tools to work (some of them are already pre-installed with the Azure/Ubuntu image):sudo apt install tmux git ranger vim
Installing LXDE
Now, let's install our desktop (LXDE). The good news is that Canonical, the good folks behind Ubuntu, already provide a metapackage called lubuntu-desktop that contains not only LXDE but Firefox and other very useful GNOME tools. We install it using the following command:Setting up Xrdp
The last and final step is to install Xrdp. As previously mentioned, this tool is required to connect to our instance using RDP. This installation downloads ~8Mb and runs very quickly after the above commands. Type the following on the shell:sudo apt install xrdp -y
sudo systemctl start xrdp
Connecting via RDP
All should be good to go now so let's try to connect to our machine. Simply enter the IP address on the RDP information and hit connect. On mine, I got the prompt: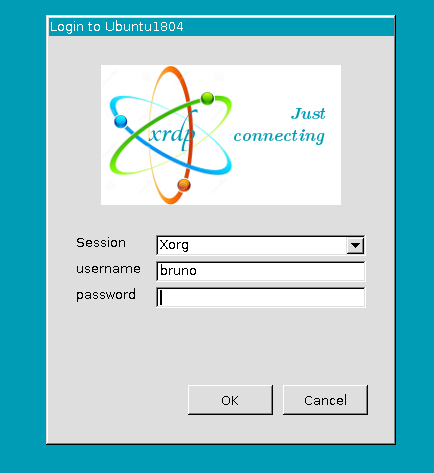
sudo passwd bruno
LXDE
If you enter your password correctly, you should login to your LXDE session. This is my awesome LXDE session running on Azure. By clicking on the blue icon above you'll have access to all the software included with the metapackage:
Persisting Changes
What happens after a reboot? Will the VM still run Xrdp? No. Unless we make the service permanent. If that's what you want, do that by running the below command on the terminal:sudo systemctl enable xrdp
Final Thoughts
The cloud is an awesome environment to test new things out. On this example I used Azure but you could reproduce pretty much everything here on your cloud provider of choice. It's also important to remember that two of the most fundamental aspects of a Linux system are customization and extensibility. So, installing/changing a GUI, trying out different software, adding/removing repos, etc should be simple on the cloud as is on a local VM. And that shouldn't prevent us from being creative and using our imagination.I encourage you to play with Azure or your preferred cloud provider and experiment not only with a Ubuntu Linux VM but other operating systems. It's all a few clicks away and a fantastic learning experience!
References
- LXDE
- lubuntu-desktop
- Ubuntu Metapackages
- Network Service Groups (NSG)
- Azure - Available disk types
- Azure - VMs Types and Sizes