Showing posts with label .Net. Show all posts

Thursday, February 3, 2022

Build .NET apps on Google Cloud Functions

It's now possible to build serverless .NET apps on Google Cloud Functions

Source: Google Cloud Blog

Among the many benefits of  using .NET in Google Cloud is the ability to build and run .NET apps on a serverless platform like Google Cloud Functions. Since it's now possible to run .NET apps on Cloud Functions, let's understand how all of that works.

What is Cloud Functions?

Cloud Functions is Google Cloud’s Function-as-a-Service platform that allows developers to build serverless apps. Since serverless apps do not require a server to run, cloud functions are a great fit for serverless applications, mobile or IoT backends, real-time data processing systems, video, image and sentiment analysis and even things like chatbots, or virtual assistants.

FaaS

To develop your .NET apps so they're compatible with Cloud Functions, Google has made available this GitHub repo.  The Functions Framework lets you write lightweight functions that run in many different environments, including:

Building your C# App

Assuming you're using .NET Core, the first thing you'll need is to build and run a deployable container on your local machine. For that, make sure that you have either Docker and the pack tool installed.

Next, build a container from your function using the Functions buildpacks:

pack build \
  --builder gcr.io/buildpacks/builder:v1 \
  --env GOOGLE_FUNCTION_SIGNATURE_TYPE=http \
  --env GOOGLE_FUNCTION_TARGET=HelloFunctions.Function \   my-first-function

Start the built container:

docker run --rm -p 8080:8080 my-first-function
# Output: Serving function...

Send a request to this function by navigating to localhost:8080. You should see Hello, Functions Framework.

Cloud Event Functions

After installing the same template package described above, use the gcf-event template:
mkdir HelloEvents cd HelloEvents dotnet new gcf-event

VB and F# support

The templates package also supports VB and F# projects. Just use -lang vb or -lang f# in the dotnet new command. For example, the HTTP function example above can be used with VB like this:
mkdir HelloFunctions
cd HelloFunctions
dotnet new gcf-http -lang vb

Running your function on serverless platforms

After you finished your project. you can use the Google Cloud SDK to deploy to Google Cloud Functions from the command line with the gcloud tool.

Once you have created and configured a Google Cloud project (as described in the Google Cloud Functions Quickstarts and installed the Google Cloud SDK, open a command line and navigate to the function directory. Use the gcloud functions deploy command to deploy the function.

For the quickstart HTTP function described above, you could run:

gcloud functions deploy hello-functions --runtime dotnet3 --trigger-http --entry-point HelloFunctions.Function

Note that other function types require different command line options. See the deployment documentation for more details.

Trying Cloud Functions for .NET

To get started with Cloud Functions for .NET, read the quickstart guide and learn how to write your first functions. You can even try it out with a Google Cloud Platform free trial.
References

See Also

Tuesday, June 1, 2021

Microservices in ASP.NET

Microservices is the last significant change in modern development. Let's learn some tools and related design patterns by building a simplified e-commerce website using modern tools and techniques such as ASP.NET Core and Docker.
Photo by Adi Goldstein on Unsplash

For some time we've been discussing tools and technologies adjacent to microservices on this blog. Not randomly though. Most of these posts derived from my open-source project aspnet-microservices, a simple (yet complicated 😉) distributed application built primarily with .NET Core and Docker. While still work in progress, the project demoes important concepts in distributed architectures.

What's included in the project

This project uses popular tools such as:
On the administrative side, the project also includes:

Disclaimer

When you create a sample microservice-based application, you need to deal with complexity and make tough choices. For the aspnet-microservices application, I deliberately chose to balance complexity and architecture by reducing the emphasis on design patterns focusing on the development of the services themselves. The project was built to serve as an introduction and a start-point for those looking forward to working of Docker, Compose and microservices.

This project is not production-ready! Check Areas for Improvement for more information.

Microservices included in this project

So far, the project consists of the following services:

  • Web: the frontend for our e-commerce application;
  • Catalog: provides catalog information for the web store;
  • Newsletter: accepts user emails and stores them in the newsletter database for future use;
  • Order: provides order features for the web store;
  • Account: provides account services (login, account creation, etc) for the web store;
  • Recommendation: provides simple recommendations based on previous purchases;
  • Notification: sends email notifications upon certain events in the system;
  • Payment: simulates a fake payment store;
  • Shipping: simulates a fake shipping store;

Technologies Used

The technologies used were cherry-picked from the most commonly used by the community. I chose to favour open-source alternatives over proprietary (or commercially-oriented) ones. You'll find in this bundle:
  • ASP.NET Core: as the base of our microservices;
  • Docker and Docker Compose: to build and run containers;
  • MySQL: serving as a relational database for some microservices;
  • MongoDB: serving as the catalog database for the Catalog microservice;
  • Redis: serving as distributed caching store for the Web microservice;
  • RabbitMQ: serving as the queue/communication layer over which our services will communicate;
  • MassTransit: the interface between our apps and RabbitMQ supporting asynchronous communications between them;
  • Dapper: lightweight ORM used to simplify interaction with the MySQL database;
  • SendGrid: used to send emails from our Notification service as described on a previous post;
  • Vue.js and Axios.Js to abstract the frontend of the Web microservice on a simple and powerful  JavaScript framework.

Conventions and Design Considerations

Among others, you'll find in this project that:
  • The Web microservice serves as the frontend for our e-commerce application and implements the API Gateway / BFF design patterns routing the requests from the user to other services on an internal Docker network;
  • Web caches catalog data a Redis data store; Feel free to use Redis Commander to delete cached entries if you wish or need to.
  • Each microservice has its own database isolating its state from external services. MongoDB and MySQL were chosen as the main databases due to their popularity.
  • All services were implemented as ASP.NET Core webapps exposing the endpoints /help and /ping so they can be inspected from and observed automatically the the running engine.
  • No special logging infrastructure was added. Logs can be easily accessed via docker logs or indexed by a different application if you so desire.
  • Microservices communicate between themselves via Pub/Sub and asynchronous request/response using MassTransit and RabbitMQ.
  • The Notification microservice will eventually send emails. This project was tested with SendGrid but other SMTP servers should work from within/without the containers.
  • Monitoring is experimental and includes Grafana sourcing its data from a Prometheus backend.

Technical Requirements

To run this project on your machine, please make sure you have installed:

If you want to develop/extend/modify it, then I'd suggest you to also have:

Running the microservices

So let's get quickly learn how to load and build our own microservices.

Initializing the project

Get your copy by cloning the project:
git clone https://github.com/hd9/aspnet-microservices

Next open the solution src/AspNetContainers.sln with Visual Studio 2019. Since code is always the best documentation, the easiest way to understand the containers and their configurations is by reading the src/docker-compose.yml file.

Debugging with Visual Studio

Building and debugging with Visual Studio 2019 is straightforward. Simply open the AspNetMicroservices.sln solution from the src folder, build and run the project as debug (F5). Next, run the dependencies (Redis, MongoDB, RabbitMQ and MySQL) by issuing the below command from the src folder:

docker-compose -f docker-compose.debug.yml up

Running the services with Docker Compose

In order to run the services you'll need Docker and Docker Compose installed on your machine. Type the command below from the src folder on a terminal to start all services:
docker-compose up
Then to stop them:
docker-compose down
To remove everything, run:
docker-compose down -v
To run a specific service, do:
docker-compose up <service-name>
As soon as you run your services, Compose should start emitting on the console logs for each service:
The output of our docker-compose command

You can also query individual logs for services as usual with docker logs <svc-name>. For example:

~> docker logs src_catalog_1
info: CatalogSvc.Startup[0]
      DB Settings: ConnStr: mongodb://catalog-db:27017, Db: catalog, Collection: products
info: Microsoft.Hosting.Lifetime[0]
      Now listening on: http://[::]:80
info: Microsoft.Hosting.Lifetime[0]
      Application started. Press Ctrl+C to shut down.
info: Microsoft.Hosting.Lifetime[0]
      Hosting environment: Production
info: Microsoft.Hosting.Lifetime[0]
      Content root path: /app

Database Initialization

Database initialization is automatically handled by Compose. Check the docker-compose.yml file to understand how that happens. You'll find examples on how to initialize both MySQL and MongoDB.

Dockerfiles

Each microservice contains a Dockerfile in their respective roots and understanding them should be straightforward. If you never wrote a Dockerfile before, consider reading the official documentation.

Docker Compose

There are two docker-compose files in the solution. Their use is described below:
  • docker-compose.yml: this is the main Compose file. Running this file means you won't be able to access some of the services as they'll not be exposed.
  • docker-compose.debug.yml: this is the file you should run if you want to debug the microservices from Visual Studio. This file only contains the dependencies (Redis, MySQL, RabbitMQ, Mongo + admin interfaces) you'll need to use when debugging.

Accessing our App

If the application booted up correctly, go to http://localhost:8000 to access it. You should see a simple catalog and some other widgets. Go ahead and try to create an account. Just make sure that you have the settings correctly configured on your docker-compose.yml file:
Our simple e-commerce website. As most things, its beauty is in the details 😊.

    Admin Interfaces

    You'll still have available admin interfaces for our services on:
    I won't go over the details about each of these apps. Feel free to explore on your own.

    Monitoring

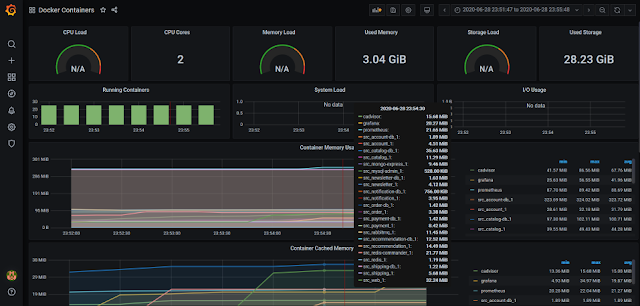
    Experimental monitoring is available with Grafana, Prometheus and cadvisor. Open Grafana at http://localhost:3000/ and login with admin | admin, select the Docker dashboard and you should see metrics for the services similar to:

    Grafana capturing and emitting telemetry about our microservices.

    Quick Reference

    As a summary, the microservices are configured to run at:

    The management tools are available on:

    And you can access the databases at:
    • MySql databases: use Adminer at: http://localhost:8010/, enter the server name (ex. order-db for the order microservice) and use root | todo as username/password.
    • MongoDB: use MongoExpress at: http://localhost:8011/. No username/password is required.

    Final Thoughts

    On this post I introduce to you my open-source project aspnet-microservices. This application was built as a way to present the foundations of Docker, Compose and microservices for the whole .NET community and hopefully serves as an intuitive guide for those starting in this area.

    Microservices is the last significant change in modern development and requires learning lots (really, lots!) of new technologies and new design patterns. This project is by far complete and should not be used in production as it lacks basic cross-cutting concerns any production-ready project would need. I deliberately omitted them for simplicity else I could simply point you to this project. For more information, check the project's README on GitHub.

    Feel free to play with it and above all, learn and have fun!

    Source Code

    As always, the source code is available on GitHub at: github.com/hd9/spnet-microservices.

    Tuesday, March 2, 2021

    Continuous Integration with Azure App Services and Docker Containers

    Enabling continuous integration between your Azure App Services and Docker Containers is simple. Learn how.
    Photo by Jason Leung on Unsplash

    Following up on a previous post where we learned how to deploy our own Docker Images to Azure App Services, today we will learn how to enable continuous deployment between our App Service and our Azure Container Registry so that our ASP.NET website is automatically updated whenever a new image is pushed to our private repository.

    On this post we will:

    If you want to follow along, please check the previous tutorials discussing how to:

    • Build a simple ASP.NET Core image on your local Docker repository
    • Create and push a Docker Image to your own Azure Container Registry
    • Deploy Docker images to Azure App Services

    Requirements

    As requirements, please make sure you have:

    Why Continuous Deployment?

    Before getting to the code, let's understand a little more about continuous deployment. Wikipedia defines it as
    a software engineering approach in which software functionalities are delivered frequently through automated deployments.
    And why practice CD? Still according to Wikipedia, CD is especially important because in an environment in which data-centric microservices provide the functionality, and where the microservices can be multiply instantiated, CD consists of instantiating the new version of a microservice and retiring the old version as it has drained all the requests in flight.

    Reviewing our App Service

    So let's start by reviewing our application. We will resume from a previous post where we explained how to deploy our Docker images to App Services. Our app looked like this:

    Our App Service Panel

    Here's its Azure panel:

    Container Services

    And here's the configuration used on the previous deployment:

    Image Setup

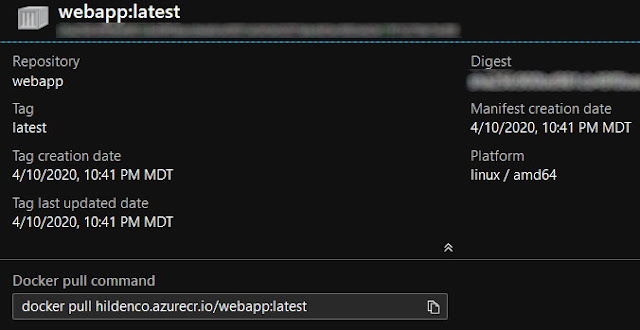
    Notice that because we're switching to continuous deployment and we'll be constantly changing the version number so sticking with v1 will no longer work. On this case, tagging our images as latest is preferred since we want automatic deployments whenever a new webapp:latest reaches the registry. As you expect, tagging an existing image is a simple process:
    docker image tag webapp hildenco.azurecr.io/webapp:latest

    Then we push that image again just so our repo contains a latest tag to configure our webhook:

    docker image push hildenco.azurecr.io/webapp:latest

    We now should now see webapp:latest in our registry:

    Enabling Continuous Deployment

    With the requirements in place, let's configure the necessary settings to deploy whenever a new webapp:latest reaches the registry.

    Enabling App Service Continuous Deployment

    To enable continuous deployment for our App Service, open your App Service -> Container Settings, set Continuous Deployment to on and the tag to latest, then save:
    This operation may take a little longer than you expect because it will create a webhook with the above configuration in our registry. See the next item for more information

    Reviewing the Container Registry webhook

    Now go to Container Registry -> Webhooks to confirm that the previous operation created a webhook for us. As seen from the history, it was never triggered so let's push a new image to test it.

    Preparing a new Version

    So let's prepare another version to test if our CD works. On this step we will change the code, rebuild the image, tag it as latest and push it to our private repo.
    Keep track of your versions. Images can contain multiple tags and they don't occupy any space. Treat your tags as releases. In case you want to restore or redeploy an older version, it's easier to find them by tag and by image ID.

    Changing the Source Code

    Firstly let's change our super-complexcode and add a link to this site in our landing page:

    Rebuilding the Image

    Next, we rebuild our webapp with:
    docker image build . -t webapp
    Then we tag it with the registry's FQDN with:
    docker image tag webapp hildenco.azurecr.io/webapp:latest

    Testing our Continuous Deployment

    With our local image ready and tagged, let's push it to our registry and verify if the webhook was triggered.

    Pushing our Image

    In order to push our image, login to ACR with:
    az acr login -n hildenco
    Then we push it with:
    docker image push hildenco.azurecr.io/webapp:latest

    Reviewing the webhook

    Refresh the webhook page and see that the hook executed successfully:

    Reviewing the logs

    And on the logs tab under Container settings, I also see that the webhook was triggered (UTC time):

    Reviewing the App

    Lastly, we can confirm that our awesome app was updated on the public URL:

    Conclusion

    On this post we reviewed how to do continuous integration from Docker containers into our Azure App Services using our private Azure Container Registry. Docker containers today are the standard way to build, pack and ship our applications and it's important to learn how tools such as private container registries can help us be more effective.

    References

    See Also 

    Tuesday, February 2, 2021

    Deploying Docker images to Azure App Services

    Deploying Docker images to Azure App Services is simple. Learn how to deploy your Docker images to Azure App Services using Azure Container Registry (ACR)
    Photo by Glenn Carstens-Peters on Unsplash

    We've been discussing Docker, containers and microservices for some time on the blog. On previous posts we learned how to create our own ASP.NET Docker images and how to push them to Azure Container Registry. Today we'll learn how to deploy these same Docker images on Azure App Services.

    On this post we will:

    Requirements

    As requirements, please make sure you have:
    If you want to follow along, please check the previous tutorials discussing how to:

      About Azure App Services

      Azure developers are quite familiar with Azure App Services. But for those who don't know, App services are:
      HTTP-based services for hosting web applications, REST APIs, and mobile back ends. You can develop in your favorite language, be it .NET, .NET Core, Java, Ruby, Node.js, PHP, or Python. Applications run and scale with ease on both Windows and Linux-based environments.

      Why use App Services

      And why use Azure App Services? Essentially because App Services:
      • support multiple languages and frameworks: such as ASP.NET, Java, Ruby, Python and Node.js
      • can be easily plugged into your CI/CD pipelines, for example to deploy from Docker Hub or Azure Container Registries
      • can be used as serverless services
      • runs webjobs allowing us to deploy backend services without any additional costs
      • have a very powerful and intuitive admin interface 
      • are integrated with other Azure services

      Creating our App Service

      So let's get started and create our App Service. While this shouldn't be new to anyone, I'd like to review the workflow so readers understand the step-by-step. To create your App Service, in Azure, click Create -> App Service:
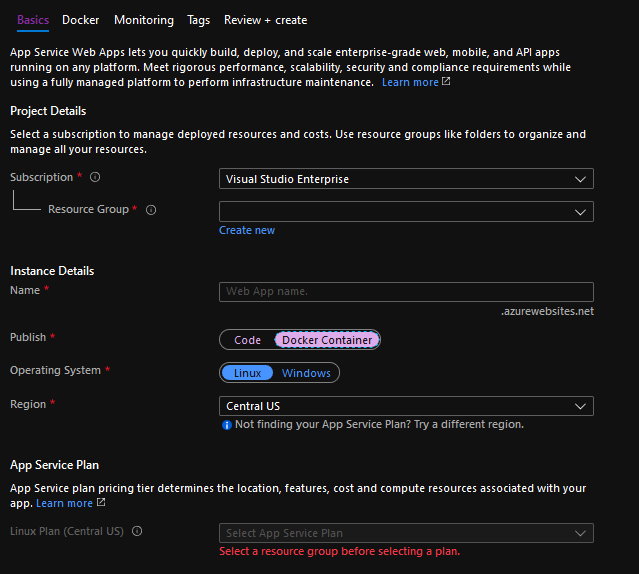
      On this screen, make sure you select:
      • Publish: Docker Container
      • OS: Linux

      Select the free plan

      Click on Change Plan to choose the free one (by default you're set on a paid one). Click Dev/Test and select F1:

      Selecting Docker Container/Linux

      Review the info and don't forget to select Docker Container/Linux for Publish and Operating System:

      Specifying Container Information

      Next, we specify the container information. On this step we will choose:
      • Options: Single Container
      • Image Source: Azure Container Registry
      • Registry: Choose yours
      Change Image Source to Azure Container Registry:
      On this step, Azure should auto-populate your repository. However, if you do not have admin user enabled (I didn't), you'll get this error:

      Enabling Admin in your Azure Container Registry

      To enable admin access to your registry, open it using the portal and on the Identity tab, change from Disable:
      To Enable and Azure will auto-generate the credentials for you:

      Specify your Container

      Back to the creation screen, as soon as the admin access is enabled on your registry, Azure should auto-populate the required information with your registry, image and tag (if one exists):
      Startup Command allows you to specify additional commands for the image (for example environment vars, volumes, configurations, etc).

      Review and Confirm

      Review and confirm. The deployment should take less than 1 second:

      Accessing our App Service in Azure

      As seen above, as soon as confirm, the deployment starts. It shouldn't take more than 1 minute to have it complete.

      Accessing our Web Application

      Let's check if our image is running. From the above image you can see my image's URL highlighted in yellow. Open that on a browser to confirm the site is accessible:

      Container Features

      To finish, let's summarize some features that Azure offers us to easily manage our containers. 

      Container Settings

      Azure still offers a Container Settings tab that allows us to inspect, change container settings for our web app.

      Container Logs

      We can inspect logs for our containers to easily troubleshoot them.
      As an example, here's an excerpt of what I got for my own container log:
      2020-04-10 04:32:51.913 INFO  -  Status: Downloaded newer image for hildenco.azurecr.io/webapp:v1
      2020-04-10 04:32:52.548 INFO  - Pull Image successful, Time taken: 0 Minutes and 47 Seconds
      2020-04-10 04:32:52.627 INFO  - Starting container for site
      2020-04-10 04:32:52.627 INFO  - docker run -d -p 5021:80 --name hildenco-docker_0_e1384f56 -e WEBSITES_ENABLE_APP_SERVICE_STORAGE=false -e WEBSITE_SITE_NAME=hildenco-docker -e WEBSITE_AUTH_ENABLED=False -e PORT=80 -e WEBSITE_ROLE_INSTANCE_ID=0 -e WEBSITE_HOSTNAME=hildenco-docker.azurewebsites.net -e WEBSITE_INSTANCE_ID=[redacted] hildenco.azurecr.io/webapp:v1 
      2020-04-10 04:32:52.627 INFO  - Logging is not enabled for this container.
      Please use https://aka.ms/linux-diagnostics to enable logging to see container logs here.
      2020-04-10 04:32:57.601 INFO  - Initiating warmup request to container hildenco-docker_0_e1384f56 for site hildenco-docker
      2020-04-10 04:33:02.177 INFO  - Container hildenco-docker_0_e1384f56 for site hildenco-docker initialized successfully and is ready to serve requests.

      Continuous Deployment (CD)

      Another excellent feature that you should explore in the future is enabling continuous deployment on your web apps. Enabling continuous deployment is essential to help your team gain agility by releasing faster and often. We'll try to cover this fantastic topic in the future, keep tuned.

      Conclusion

      On this post we reviewed how to create an Azure App Service and learned how to deploy our own Docker Images from our very own Azure Container Registry (ACR) to it. By using ACR greatly simplified the integration between our own Docker Images and our App Services. From here I'd urge you to explore continuous integration to automatically push your images to your App Services as code lands in your git repository.

      References

      See Also

      Tuesday, January 5, 2021

      Pushing Docker images to ACR - Azure Container Registry

      Building ASP.NET Core websites with Docker? Learn how to use Azure Container Registry.
      Photo by Hal Gatewoodon on Unsplash

      Since you now understand how to create your own ASP.NET Core websites with Docker, the next step in your container journey is learning how to push your images to a container registry so they can be shared and deployed somewhere else.

      Today, we will push our own ASP.NET Core Docker images to Azure's Container Registry (ACR) and deploy them to our own custom CentOS server. Sounds complicated? Let's see.

      On this post we will:
      • (Quickly review how to) Create our own Docker images.
      • Create our Azure Container Registry to host and share our images.
      • Push our own Docker images to our new container registry.
      • Pull and run our images from a CentOS server.

      Requirements

      For this post you'll need:

      Managed Container Registries

      Today, Docker Hub is still the world's most popular container registry. But do you know what container registries are? I like this definition from GCP:
      A Container Registry is a single place for your team to manage Docker images, perform vulnerability analysis, and decide who can access what with fine-grained access control. Existing CI/CD integrations let you set up fully automated Docker pipelines to get fast feedback.

      Why create our own container registry?

      Okay but if we already have Docker Hub, why bother creating our own container registry?

      Because as we will see, pushing our images to a managed container registry allows you to not only share your images privately with other developers in your organization but also to utilize them in your CI/CD - in an integrated fashion -, process and deploy them to your cloud resources such as Virtual Machines, Azure App Services and even Azure Kubernetes Services.

      In summary, the main advantages of creating our own container registry are:
      • have our own private repository
      • use it as a source of deployment for our artifacts, especially if on the same cloud
      • integrate with your CI/CD process to produce automated pipelines
      • use a cloud-hosted service, alleviating our ops team
      • have automated vulnerability scans for our own images
      • geo-distribute your images so teams around the globe can access them quickly

      Alternatives to ACR (Azure Container Registry)

      But what if you use a different cloud? No problem! Apart from ACR and Docker Hub today we also have: Amazon ECS, Red Hat's QuayGoogle Container Registry (GCR) and Digital Ocean's Container Registry.

      And which registry should I choose? I'd recommend using the one offered by your cloud provider since they will have better integration with resources on your cloud resources. In other words, on AWS? use ECS. On Google Cloud? Use GCR. On Azure, go with ACR. Else, stick with Docker Hub.

      Creating our Azure Container Registry

      So let's get to work. There are essentially two ways to create our own registry on Azure: via the CLI and via the portal. Since the Azure CLI alternative is already very well documented, let's review how to do it from the portal.

      Click New Resource, type Container Registry and you should see:

      Click Create, enter the required information:
      Review and confirm, the deployment should take a few seconds:

      Reviewing our Container Registry

      Once the deployment finishes, accessing your own container registry should get you to a panel similar to the below. In yellow I highlighted my registry's URL. We'll need it to push our images.

      I like pinning resources by project on a custom Dashboard. Fore more information, check this link.

      Preparing our Image

      Let's now prepare an image to push to the remote registry. I'll use my own available on GitHub but feel free to use yours if you already have one available.

      Pulling a sample .NET image

      If you followed my previous post on how to create ASP.NET Core websites using Docker, you probably have our webapp ASP.NET Core 3.1 image on your Docker repository. If not, please run:
      git clone https://github.com/hd9/aspnet-docker
      cd aspnet-docker
      docker build . -t webapp
      Then type the below command to confirm your image is available locally:
      docker image ls
      docker images or docker image ls? Both are the same but since all commands to manage images use the docker image prefix I prefer to follow that pattern. Feel free to use what suits you better.

      Tagging our image

      Before pushing our image we still need to tag it with the full repo name and add a reasonable version to it:
      docker tag webapp <acrname>.azurecr.io/webapp:v1
      You have to tag the image with the fully qualified domain name (ex. yourrepo.azurecr.io) in the name else, Docker will try to push it to Docker Hub.

      Run docker image ls once more to make sure your image is correctly tagged:

      Pushing our Image

      With the image ready, let's push it to our registry.

      Logging in to our Registry

      The first thing we'll need is to authenticate using the Azure CLI. On a Windows terminal, type:
      az acr login --name <your-acr-name>
      if you used the az tool before, you're probably logged in and you won't be required to enter any username/password. Else, you'll need to sign in with the az login command then sign in again with az acr login. Check this page for more details.

      Now the big moment. Push the image to the remote repo with:
      docker push <acrname>.azurecr.io/webapp:v1
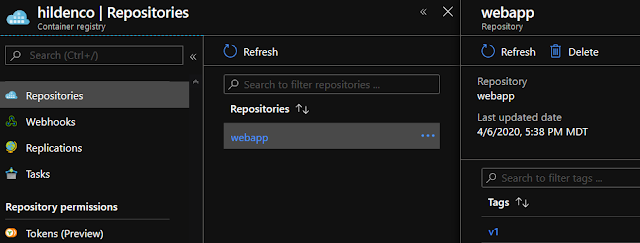
      If all went well, you should see on the Services/Repositories tab, our image webapp as a repository:
      And clicking on our repo, we see v1 as Tag and additional info about our image on the right:

      Deploying our image locally

      Pulling and running your remote image locally should be really simple since tools/credentials are in place. Run:

      docker pull hildenco.azurecr.io/webapp:v1
      docker run -d webapp

      Deploying our image to a remote Linux VM

      But we're here to learn so let's complicate this a little and deploy this image to a remote Linux VM. For this part of the tutorial, make sure your VM is ready by installing the following requirements:
      To avoid sudoing all the time with Docker, add your user to the docker group with sudo usermod -aG <username>

      Authenticating with the Azure CLI

      If you recall, we had to login to our repo from our development box. Turns out that our CentOS VM is another host so we'll have to login again first with the main az login:
      az login
      Then login on ACR:
      az acr login --name <your-acr-name>

      Pulling our Image from CentOS

      With the authentication in place, pulling the image from our CentOS should be familiar:
      docker pull hildenco.azurecr.io/webapp:v1

      Running our Container

      The last step is to run our image and access it from outside. To run our image we do:
      docker run --rm -d -p 8080:80 hildenco.azurecr.io/webapp:v1
      Where:
      • --rm: remove container when stopped
      • -d: run in detached (background) mode
      • -p 8080:80: map port 80 on container to external 8080 on host

      Accessing our Container

      Then, accessing from outside requires knowing the VM's IP address and accessing it from the development box (host). To know your CentOS's IP, type:
      ip a show eth0
       Then, with the IP, access it from your favourite browser:

      Conclusion

      On this article we described how to create our own Azure's Container Registry on Azure, push, pull and deploy images from it to a CentOS virtual machine. With the growth of microservices, knowing Docker becomes an essential skill these days. And since containers are the way developers build, pack and ship applications these days, knowing how to use a managed container registry will be an essential asset for your team.

      Source Code

      As always, the source code for this post is available on my GitHub.

      References

      See Also

      About the Author

      Bruno Hildenbrand