CentOS is an powerful, secure and reliable Linux operating system for servers and for the cloud. On this post, let's learn how to install it on Hyper-v.
 |
| Photo by Krzysztof Kowalik on Unsplash |
On a previous post, we reviewed the benefits of using CentOS. Since I've been using Fedora on the desktop and CentOS on the server for many years now, I thought I'd like to try it on a virtual machine with Hyper-V. Running a Linux distro on a local VM is good for testing new software, validating compatibility with your tools and learning a new system. Using Hyper-V is particularly interesting if your want to upload a custom VM to Azure.
CentOS Stream
But what's CentOS Stream? For those who don't know, CentOS Stream is a new addition to the CentOS family. As per the documentation:
CentOS Stream is a rolling-release Linux distro that exists as a midstream between the upstream development in Fedora Linux and the downstream development for Red Hat Enterprise Linux (RHEL). It is a cleared-path to contributing into future minor releases of RHEL while interacting with Red Hat and other open source developers. This pairs nicely with the existing contribution path in Fedora for future major releases of RHEL.
Why CentOS?
I reviewed in details why use CentOS on a previous blog post. Essentially, one should CentOS because CentOS is:- secure: CentOS comes with a LTS kernel, has embedded support for cryptography and runs SELinux.
- very stable: updates and releases are extremely tested by the community.
- 10-year support: you can run previous versions of CentOS knowing you'll get updates and patches for up to 10 years.
- robust and mature ecosystem: you can find all the best open-source tools in CentOS repos
- cloud friendly: private or public cloud? You can run CentOS on it
- container friendly: CentOS is ready to run all your favourite container tools (LXC, LXD, Docker, Podman, etc).
- open-source, community based: the CentOS community is receptive, supportive and eager to help.
- multi-platform: as expected, CentOS runs on the most popular architectures.
- validated on critical environments: CentOS runs on millions of servers worldwide including mission critical environments.
To learn more about how CentOS is being used, check their official YouTube channel.
Why developers should care about CentOS?
This blog is all about development so why should developers care about CentOS? My personal opinion is that we developers should know well not only our own tools (programming languages, databases, IDEs, etc) but also infrastructure, networking, security, cloud, devops, containers, etc. A developer that understands how their services are deployed and run, usually produces better, faster and more reliable code.Why not just use Ubuntu everywhere?
Most people that use Ubuntu on the desktop think that an Ubuntu server or an Ubuntu container are the best alternatives. Turns out that as we saw on a previous post, there's no right or wrong, just what works best for you. Personally I find Alpine Linux is a better choice for containers, Fedora better for the desktop and CentOS, the best on servers. Another reason to stay on the RH family is that Red Hat usually releases patches faster (including security fixes for CVEs), runs on millions of servers worldwide and features fantastic free/open source software repositories.What about the desktop?
Should we run CentOS on our desktops/laptops? The short answer is no, I wouldn't recommend CentOS for the desktop unless 1) you really need a stable system, 2) don't run recent hardware and/or 3) don't play games or run non-free software in it. Servers not only have a slower release pace and are more strict on hardware support. Personally for the desktop, I would recommend Fedora or Ubuntu. However, CentOS Stream, being a rolling release looks promising. I'd definitely like to try it out in the future.Downloading CentOS Stream
We'll begin this demo by downloading the latest ISO with:
wget http://isoredirect.centos.org/centos/8-stream/isos/x86_64/CentOS-Stream-8-x86_64-20191219-dvd1.iso
I'm using wget above but fell free to hit that url with your favourite browser.
Creating the Image
So let's proceed with image creation. Since most of the Hyper-V generics should be straight-forward, I'd like to point out that:- In my tests, Generation 1 worked better than Gen 2, so let's use that
- We'll use VHDX - a dynamic virtual disk for Hyper-V virtual machines
- We'll install basic a basic, gui-less CentOS server
- The installer will require at least 7Gb of disk (including swap) and 1Gb of memory
Specifying a name
To start, let's specify a name for our VM. For mine, I'll simply name it centos:
Select a generation
We'll stick with Gen1 as it has better compatibility with our image.
Assign memory
I chose 4GB but 1GB should be enough. Using dynamic memory is preferable as it won't overload your host.
Configure networking
Choose the default switch on this one. The default switch is simply a virtual network adapter available on your Windows host so that your VMs can access the network (trough it). It's available on the networking pane on Windows.
Virtual hard disk
Select Create a virtual hard disk, enter a name and specify a location. Hyper-V will create a virtual hard disk for. VHDX is recommended as it doesn't need to pre-allocate the specified size if not in use.
Summary
Review the summary and finish.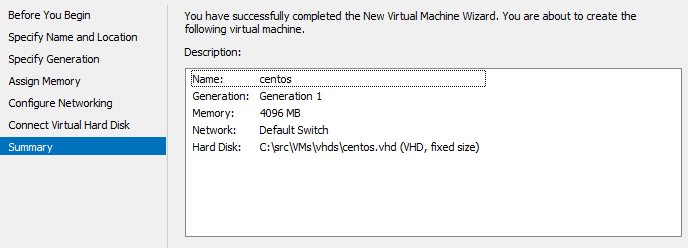
Before the first boot
Before the first boot, we still have to select and mount our ISO so our VM boots straight from it. We can do that in the settings panel as shown below. I also like to disable checkpoints and automatic start/stop actions as we won't need that.
Booting the Image
After setting the DVD image to our ISO, we're ready to boot our image. Run it from Hyper-V and you should see the below image, Select Install CentOS on disk:
- Language: English/US
- Software selection: minimum install
- Installation Destination: default, we'll let CentOS preconfigure everything for us;
Initial screen
If you reached this point, the installer and the boot were successful. Proceed by choosing your language:
Installation Summary
Next, we're taken to the installation summary. This is where most of the configuration will happen. As seen below, the only required input is Installation Destination. Click it to proceed with the disk configuration.
Installation Destination
We'll keep things simple and choose the virtual hard disk (sda, 10Gb) and click Done:
Want to encrypt our data? Simply check the Encrypt my data option above.
Networking
I recommend enabling networking during the installation. We'll need network access to download updates. It will also auto-set networking during boot and provide an IP for our VM via its internal DHCP service.
Software Selection
It's now time to specify which features we want. I'm traditional and I prefer my servers GUI-less so let's choose Minimum Install:
Create user and set root password
During installation, you also have the opportunity to create an account and set root's password. It's recommended to do both.
When creating the user, make sure you check the "Allow sudo" option. It will add your user to the wheel group which's essentially part of the sudoers list.
Post-Installation
After the installation is finished, turn off the VM, eject the virtual ISO and start the image again. You shouldn't expect anything fancy on your first boot. Login as root and ping an external service to validate the network is up:
Updating the System
With the network up, we can update our system by running as root:
dnf update

Most CentOS users use yum to perform system maintenance. Starting on RHEL 8, Yum v4 is nothing more than a wrapper for DNF.
Testing SSH
So let's try to connect to this VM via ssh. We can start by querying the service status with:
systemctl status sshd

ip a

ssh <ip>

who

What Next?
Now that we have a working CentOS server VM running locally, what's next? The intent of installing CentOS is to familiarize with one of the leading operating systems on the cloud which you'll most likely will run into as a developer. That said, consider reading:- Configure basic system settings
- How to install software
- Introduction to systemd
- Managing Firewall, SELinux and SSH Logings
- Installing Docker on CentOS 8
Conclusion
On this post we reviewed how to install CentOS Stream on a Hyper-V hypervisor. CentOS is a very solid choice for the server running today on millions of servers worldwide. We also discussed why developers should look to learn better not only their tools (programming languages, databases, IDEs, etc) but also infrastructure, networking, security, cloud, devops, containers, etc. A developer that understands how their applications are deployed and run, usually produces better, faster and more reliable source. And knowing CentOS and running Linux on your desktop are excellent ways to start.References
- CentOS FAQ
- CentOS HowTos
- CentOS Tips and Tricks
- What's new with CentOS at Facebook
- What Is a VHDX File
See Also
- My journey to 1 million articles read
- 20 tips to manage Linux VMs on Azure
- How to create a CentOS VM on Azure
- Why use CentOS
- Why use Fedora Linux
- How I fell in love with i3
- Windows Subsystem for Linux, the best way to learn Linux on Windows
- Creating a Ubuntu Desktop instance on Azure
- Copying data between Azure databases in 3 easy steps