
|
| Photo by Chirstopher Gower on Unsplash |
Setting up an Azure DevOps pipeline is not too complicated. On this tutorial,
let's learn how to setup a simple pipeline to a basic Node.js app so we can build, test and capture
test results and report code coverage analysis, exposing them to
everyone in the team.
On this tutorial we will:
- Create a new DevOps Pipeline
- Build our project
- Configure DevOps to read the outputs of our tests and test coverage
Sample Project
This tutorial can be executed using this repository.Setting up a Connection
To get started, we have to grant Azure DevOps access to your external repo, GitHub on this case. To configure a new connection, click on Project Settings on the bottom left in your navigation bar:
Then click on Boards -> GitHub connections:

Now, click on New Connection:

And click Connect your GitHub account:

Finish the integration by entering your username/password and authorizing access to your GitHub account and repositories.
Creating a new DevOps Pipeline
Now that your Azure DevOps has access to your GitHub repos, let's build our first pipeline. Click on Pipelines -> New Pipeline on top right to create a new one:

Choose a source repository
Next, select where your project is located. Since we're using GitHub for this demo, click on it:

And choose, one of your existing repositories:

Configuring the Pipeline
Next, DevOps will ask you to specify your project type. Since we're building a Node.js project, choose it from that list:

Click Next and you should see a default build yaml for your new project that should look more a less like this:
Running our first build
If all your dependencies can be satisfied by npm, most likely your project can be built so click Save and run so that DevOps builds your project for the first time:

By clicking on the columns on the left, we can even inspect the result of the build. For example, here's the output of npm install and build:

Coming back to out pipeline page, we get our first successful build:

Step 4 - Setup Unit Test reporting
But as good as the initial template is, it does not auto-enable unit-testing and code coverage reporting, so let's set it up. To change the pipeline in the future, click on the Dots menu -> Edit Pipeline:

You'll be redirected to the editor. On the Tasks menu on the right, type test results and click on Publish Test Results to add it as a new task in our azure-pipelines.yml file:

Next screen, select JUnit, follow the configuration below and click Add:

Step 5 - Setup Code Coverage reporting
Similarly, type code coverage on the Tasks menu on the right, to add the code coverage task:

And set:
- Coverage tool: Cobertura
- Summary file: coverage/cobertura-coverage.xml

Review and Save
The above steps should have added something similar to the below on your azure-pipelines.yml:
Click Save and Run again to produce a new build. Once your build is finished, it should show up in the pipeline's main screen:

Reviewing Test Results and Test Coverage
To wrap it up, let's review our test results/coverage reports. Clicking on the second build should take you to the build page:
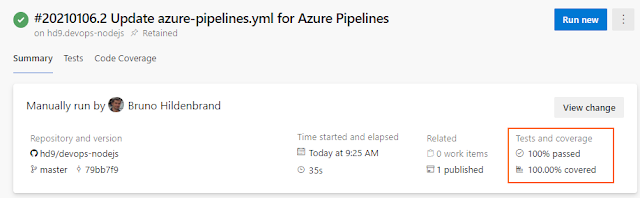
Highlighted in the above image, both are links that take us to the tests page so we can review test results:

Cool, isn't it? Clicking on the cover tests link above, we're taken to the Code Coverage page where we're able to see the code coverage in our project:

Conclusion
On this article we reviewed how to setup a simple Azure DevOps pipeline to build, test and report code coverage for a basic NodeJS app exposing them in the build. Azure DevOps is a pretty powerful CI/CD system but unfortunately, often ignored by the community. Feel free to explore it!
Source Code
As always, the source code for this post is available on my GitHub.
References
- Build, test, and deploy JavaScript and Node.js apps
- Azure Pipelines | Microsoft Azure
- What is Azure Pipelines? - Azure Pipelines | Microsoft Docs
- Azure Pipelines documentation | Microsoft Docs
See Also
- Microservices in ASP.NET
- My journey to 1 million articles read
- Adding Application Insights to your ASP.NET Core website
- Configuration in .NET Core console applications
- Building and Hosting Docker images on GitHub with GitHub Actions
- Hosting Docker images on GitHub
- Send emails from ASP.NET Core websites using SendGrid and Azure
- Async Request/Response with MassTransit, RabbitMQ, Docker and .NET core
- How to build and run ASP.NET Core apps on Linux
- 5 tools for Azure Development on Linux