Monday, June 25, 2018

How to install Docker on Linux

Interested in running .NET Core applications on Docker and Linux? Read to know more.

In a previous post, I detailed how to run RavenDB on Docker. On this post, let's review in more detail how to install Docker on Linux so we can develop our applications using Docker containers. But before we review how to install it, what is Docker anyway?

Docker

Docker provides a way to run applications securely isolated in a container, packaged with all its dependencies and libraries. Docker adds security, reliability, universal packaging and runs anywhere!

Why should I care about Docker?

Well, on that case it's better reading this. Long story short is that docker is way more efficient than full VMs, is very easy to install and has a huge repo of images that you can install on your machine. It's perfect for developers that have to install complex systems like RabbitMQ, Redis or PostGresSql on their machines. Let's take a look.

How Docker differs from VMs?

If you're interested on this topic, there's an interesting article that describes how Docker differs from VMS.

Installing Docker on Linux

Being Fedora, Ubuntu, Mint, Arch or whatever else Linux distro you're using, the way most users are installing Docker is by jumping into the terminal and running a command. It's that simple because the required packages are available on your distro's repository for free, courtesy of the awesome people that maintain those packages.

Because I've been running Fedora for 3 without distro-hopping and am very satisfied with my choice, let's use it for this demo.
# install docker on Fedora/CentOS
sudo dnf install docker
On Ubuntu, one might type:
# install docker on Ubuntu/Debian/Kali/Mint
sudo apt-get install docker
After accepting, I see that everything has finished successfully and I'm ready to start the service:

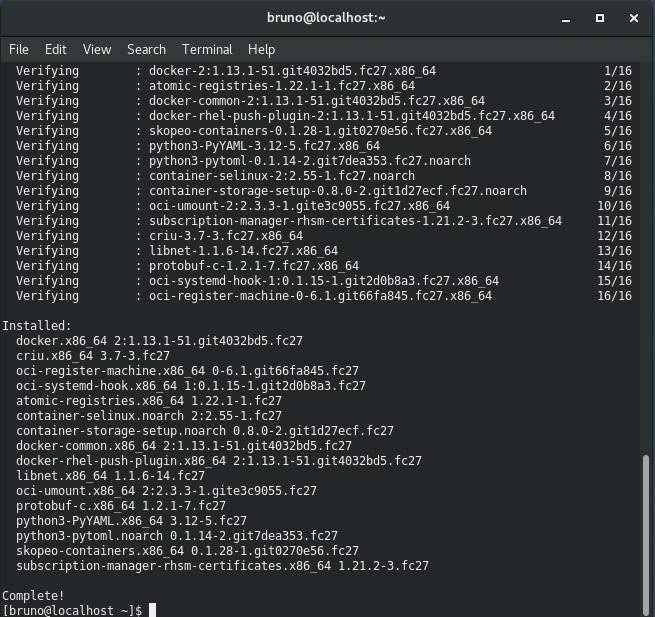
Starting the Service

The docker bundle contains a client and a server. The client can be accessed by just typing docker:
So if I run docker ps with the server not started, I get the following error:
Finally, to start the service, I run:
# Ubuntu/Fedora/and distros running SystemD
$ sudo systemctl start docker

Testing the Install

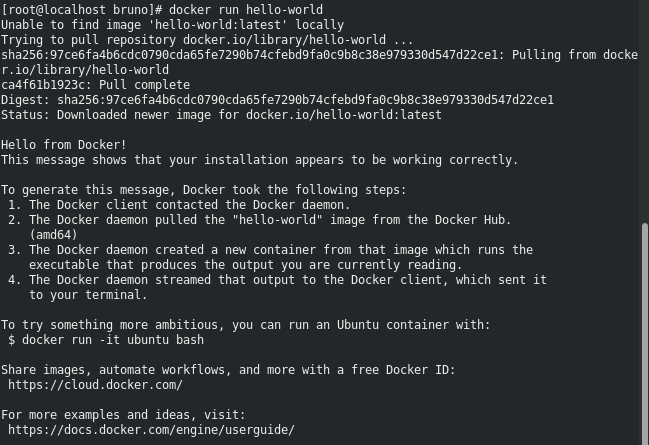
In order to test the installation, I can then run as root:
# running the docker hello-world image (all distros)
docker run hello-world
Then, I can run docker ps again and see the command running successfully:

Installing on Windows and Mac

Installation on Windows and Mac should be straightforward too. Simply download the executable (Windows Users, Mac Users) and install on your machine.

Features Included

  • Integrated Docker platform and tools Docker command line, Docker Compose, and Docker Notary command line.
  • Automatic updates with channels for monthly Edge and quarterly Stable versions of Docker.
  • Fast and reliable performance with native macOS virtualization running a custom minimal Linux distro.
  • Seamless volume mounting for code and data, including file change notifications that unlock fast edit-test cycles.
  • Native Mac security support
  • In container development and debugging with supported IDEs.

Conclusion

We just showed how to install docker on Linux. For most distros it should be pretty similar. Windows and Mac users should follow the links provided and the installation format should be pretty standard.

References

See Also

Friday, June 22, 2018

Blazor, a new framework for .NET web apps

There's an emerging way to develop web applications on the .NET world: Blazor. Read and understand what changes.

There's a new talk from the awesome Steve Sanderson on the new Blazor framework. For those who don't know Blazor, it's a Full-stack web development with C# and WebAssembly. It's an experimental project exploring what would be building .Net applications using the .Net framework and C# that run in the browser using WebAssembly.

I've been following Blazor and am very excited with the direction the project is taking and following it very closely. Hope this project matures enough and gets incorporate in the .Net Core framework on the next release.

Blazor and WebAssembly

Steve Sanderson describes on Blazor: a technical introduction details about the Blazor Framework that are worth reading. Basically we'll have two modes: interpreted and ahead-of time. Take a look at the differences below.

Interpreted Mode

In interpreted mode, the runtime is compiled to WebAssembly, but the .NET assembly files are not. The browser then load and execute the runtime, which loads and execute s standard .NET assemblies built by the normal .NET build tools.

Diagram showing interpreted mode

Ahead-of-time (AOT) compiled mode

In AOT mode, your application’s .NET assemblies are transformed to pure WebAssembly binaries at build time
Diagram showing AOT mode

Blazor Presentation

The full blazor presentation is available on YouTube. I encourage you to watch it.

Final Thoughts

Blazor is really exciting and is being in active development. We will revisit the latest updates and surely update this post and build some prototypes in the future. Keep tuned. 

Monday, June 11, 2018

Running RavenDB on Docker

Developers are now able to run RavenDB on Docker. On this post, let's review how that works.

RavenDB 4.0 brought us ability to be run Docker containers. On this post, let's review in detail how that works and test it on a Linux box. But before, let's jump directly to a quick review on how to get it installed on our Linux boxes.

Installing Docker

Installing Docker on Ubuntu/Fedora workstations shouldn't be more complicated than running these 2 lines below on the terminal. Windows users please check this page out.

Installing on Ubuntu

# In Ubuntu and Debian-based distros
sudo apt-get install docker

Installing on RH-based distros (Fedora, CentOS, etc)

# In RH based distros
sudo dnf install docker

Running a Docker RavenDB Instance

Now the fun part! Running RavenDB on Docker is super simple. The RavenDB team on Docker Hub already provided a Docker image that can be downloaded directly from Docker Hub. Assuming that your machine has internet connection, we just need to run the command below on a terminal:
sudo docker run -p 8080:8080 ravendb/ravendb
For example, when I ran that command on my Fedora machine, I get:

Reviewing the Previous Command

Let's review what happened on the above screenshot:
  • Docker detected that I didn't have the image available locally so it pulls the binary directly from Docker Hub
  • After completed the download, the RavenDB initialization starts
  • We then see RavenDB initialization messages such as Tcp listening on 172.17.0.2:38888. This is Raven's telling us its default TCP port. Note that we didn't map that port out of the container, so it will not be available
  • Once the "Running non-interactive" message is outputted, the instance is ready to be tested.

Accessing the Instance

With the RavenDB docker instance running, let's see how to access it. Since we mapped the internal and external container ports to 8080, I can access my instance by navigating to https://localhost:8080/ The "Welcome message" shows up as for a regular installation. It's because that docker instance is treated as a brand new installation.

Configuring RavenDb's Docker Instance

Now, let's proceed with the configuration of our RavenDB instance. I have outlined everything here in case you want to review it. TLDR, click on "Unsecure" to start initialize a development version:

Then Raven Studio is open for us. This is what we need to start interacting with the database:

Post-Installation

That's it! You now have a simple RavenDB Docker node running on your machine. Please note that In Docker, we can also use port mapping with the -p flag, To do so, we'll need to check the box "Customize external IP and Ports" and supply the external IP address as well as the exposed ports. So I then can create container using:
$ sudo docker run -t -p 38889:38888 -p 443:8080 ravendb/ravendb
I recommend exploring other parameters when running the RavenDB docker container. More information is available on this page.

Conclusion

In this post I demoed how easy it is to have RavenDB running on Docker on your machine. Ideal solution for those who just a simple instance to start playing with. Also notice how simple it was to run RavenDB on my Fedora Linux workstation.

Try it out. This is a fast, simple and quick way to test RavenDB on your machine.

References

See Also

Monday, June 4, 2018

Installing and Running RavenDB on Windows and Linux

Let's install and run RavenDB on Windows and Linux and learn how it works.

On a previous post  I introduced RavenDB on this blog. On this one let's review how to install or run a standalone RavenDB instance on our machine.

On this post we will cover:
  1. Installing and running on Windows;
  2. Installing and running on Linux;
  3. Using the RavenDB console tool;
  4. Creating a new database;

Downloading RavenDB

First off, navigate to the RavenDB downloads page and download the server version for the environment you're working on. The currently supported platforms are: Windows, Linux, OSX, Raspberry PI and Docker.

To download your image, select Server, Stable and the appropriate version for your environment. Aaccept the terms, click on the .ZIP Package download button to download the image to your disk.

Running standalone RavenDB on Windows

On Windows, once the download is completed, extract all those files in a folder and you'll see two PowerShell files: run.ps1 and setup-as-service.ps1.

Open the Powershell terminal, cd into the folder you extract your files and run .\run.ps1 You'll then see some outputs the RavenDB service is emitting for us when running as a standalone instance:
A new window will open for you where you'll need to configure a cluster and/or security. For now, let's skip the cluster configuration and go with the Unsecure option. 

This configuration is enough for this demo and simple development efforts. Clicking on it, RavenDB Studio will open on the default Url: http://127.0.0.1:8080/studio/index.html.
That's it! The standalone instance is running and you can start testing RavenDB on your Windows box.

Installing on RavenDB Windows

To install you your machine,  open the PowerShell terminal as an administrator and run the setup-as-service.ps1 script.

If all goes well, you'll  have to accept the user license agreement and proceed with the instance configuration.

Note that:
  • the installation requires administrator privileges
  • will use port 8080 for "unsecure" installs or 443 for secure (options selected during the installation)

Configuring the new Instance

After installed, you'll have to configure your instance as shows the image below. For a development setup, you should be good with the Unsecure option.
Clicking on it, will prompt you for Http/Tcp ports and IP address. Leaving empty will use the defaults. Click "Restart Server" and RavenDB should be installed.

The RavenDB Service

Once installed, on Windows, we can view the service status using the Get-Service Powershell cmdlet:
Get-Service -Name RavenDB

For more information, please visit: https://ravendb.net/docs/article-page/4.0/csharp/start/installation/setup-wizard

Running standalone RavenDB on Linux

The Linux installation is similar: download your Linux image from the RavenDB downloads page, unzip it and run the script. Let's see how it works.

Download the image by selecting Linux x64 from the downloads page and download it using Firefox:
Once downloaded, extract the bz2 pkg on a local folder:

Cd into that folder and run "run.sh". I should then see:

Installing RavenDB on Linux

Installing RavenDB on Linux is very similar to Windows. You run the run.sh shell script and select the installation option on the command line.

The RavenDB Console

After installed, basic manipulation of the server can be done either by using the Raven UI (Raven Studio) or by using the console previously opened.

For example, when I type help on my shell in Fedora, I get:
From the console, You can do things like restarting/shutting down the server, like exporting/importing data, reading logs and viewing server stats. Just type the commands shown. For example, to shut the instance down, I should type: shutdown.

Creating a Database

The final needed step before touching code is to create a database. For that do: Databases -> New Database:
Enter a DB name (for example, "Blog") and click "Create"):
Clicking on that Database creates our database and takes us to the its page. From there we basically can view our documents (records), create, query, patch, view logs, stats, etc:

Next Steps

Now that RavenDB is running and the database is created, the next step is to start interacting with it. You can use either RavenDB Studio or the client Api (with C#, Java, Python, etc). For more details, check my simple introduction to RavenDB.

Don't forget that RavenDB is also available on the cloud. Check the article An in depth review of the RavenDB Cloud for more information.

Conclusion

Hope this post shows how is a simple introduction on how to install RavenDB on Windows and Linux boxes. For more information, check the official documentation.

About the Author

Bruno Hildenbrand      
Principal Architect, HildenCo Solutions.