Showing posts with label Alpine. Show all posts

Tuesday, September 1, 2020

Hosting Docker images on GitHub

Hosting our own Docker images on GitHub is simpler than you think. On this post, let's review how.
Photo by Annie Spratt on Unsplash

We recently reviewed how to host our NuGet packages on GitHub. Turns out that another popular feature of GitHub Packages is hosting Docker images. Given that GitHub is the world's largest development website and you're probably already hosting your code up there, why not also review how to build, host and consume our own ASP.NET Core Docker images on it?

On this post we will:

Requirements

To run this project on your machine, please make sure you have installed:

If you want to develop/extend/modify it, then I'd suggest you to also have:

About GitHub Packages

GitHub Packages is GitHub's free offering for those wanting to host their own packages or Docker images in GitHub itself. The benefits of using GitHub Packages is that it's free, you can share your images privately or with the rest of the world, integrate with the GitHub API, GitHub Actions, webhooks and even create complex end-to-end DevOps workflows.

Building our Docker Image

So let's quickly build our Docker image. For this demo, I'll use my own aspnet-docker project. If you want to follow along, open a terminal and clone the project with:
git clone https://github.com/hd9/aspnet-docker

Building our local image

Next, cd into that folder and build a local Docker image with:
docker build . -t webapp:0.0.1
Now confirm your image was successfully built with:
docker images
You should see something along the lines of:
webapp      0.0.1               73a91c1204db        21 seconds ago      212MB
For more information on how to setup and run the application, check the project's README file.

Testing our local image

Before pushing our image to GitHub, let's make sure it runs fine with:
docker run --rm -d -p 8080:80 webapp:0.0.1
Test it at http://localhost:8080/. Here's what you should see:

Pushing packages to GitHub

With the image ready and working, let's review how to push your own Docker images to GitHub.

Generating an API Key

In order to authenticate to GitHub Packages the first thing we'll need is an access token. Open your GitHub account, go to Settings -> Developer Settings -> Personal access tokens, click Generate new Token, give it a name, select write:packages and save: 
Now copy the API key provided, we'll use it in the next step.

Logging in with Docker

To push our images to GitHub, first we log in with:
docker login https://docker.pkg.github.com -u <github-username> -p <api-key>
Or, you could echo your api key from a file with:
cat api-key.txt | docker login https://docker.pkg.github.com -u <github-username> --password-stdin
Or even better, using an env var with:
echo $<envvar-name> | docker login https://docker.pkg.github.com -u <github-username> --password-stdin

Tagging our image

With the login successful, we now need to tag the image and push. Let's tag it first with:
docker tag <img-name> docker.pkg.github.com/<gh-user>/<repo>/<img-name>:<version>
Confirm you get both images with docker image ls:
docker image ls
Here's what you should see:
REPOSITORY                                       TAG       IMAGE ID       CREATED             SIZE
webapp                                           0.0.1     73a91c1204db   30 minutes ago      212MB
docker.pkg.github.com/hd9/aspnet-docker/webapp   0.0.1     73a91c1204db   30 minutes ago      212MB

Pushing the image to GitHub

Finally, push it to the remote repo with:
docker push docker.pkg.github.com/<gh-user>/<repo>/<img-name>:<version>
Here's what I got during my tests:

Reviewing our image on GitHub

Let's confirm our image was successfully pushed to GitHub. Open your project's page and click on Packages. Our webapp package looks like this:

Using our image

To consume our image we'll have to (1) login with docker, (2) pull the image and (3) run it. As previously mentioned, I'll run it from a different box. This time on an Alpine Linux VM I love playing with.
To learn how to install and run Docker on Alpine, check this link.
Let's once more login on GitHub with Docker with:
docker login https://docker.pkg.github.com -u <github-username> -p <api-key>

Pulling the image the image

After the login, pulling our image is as simple as:
docker pull docker.pkg.github.com/<gh-user>/<repo>/<img-name>:<version>
For context, here's my pull in action:
After the pull confirm with docker image ls:

Run the image

And finally run our image with:
docker run --rm -d -p 8080:80 webapp:0.0.1
If you want, confirm your image is running with:
docker ps

Accessing the container

Lastly, let's confirm we can access it from our host. On Alpine, enter ip a show eth0 to show the VM's internal IP:
And finally, access it from the host (your machine) with your browser. On my case, http://172.27.197.46:8080/:

Final Thoughts

On this post we reviewed how to build our own Docker images, pushed them to GitHub and finally demoed how to consume them on a different machine. Creating and hosting our own Docker images on GitHub is valuable as you can share your images privately, with the rest of the world, integrate with GitHub APIs, GitHub Actions, webhooks, creating complex end-to-end DevOps workflows and even deploy them to a Kubernetes cluster. We'll evaluate that in the future so keep tuned!

Source Code

As always, the source code is available on GitHub.

See Also

Monday, August 10, 2020

Creating ASP.NET Core websites with Docker

Creating and running an ASP.NET Core website on Docker using the latest .NET Core framework is fun. Let's learn how.
Photo by Guillaume Bolduc on Unsplash

Docker is one the most used and loved technology on the market today. We already discussed its benefits, how to install it and even listed technical details every developer should know. On this post, we will review how to create an ASP.NET Core website with Docker Desktop using the latest .NET Core 3.1. After reading this post you should understand how to:
  • Create and run ASP.NET Core 3.1 website
  • Build your first container
  • Run your website as a local container
  • Understand the basic commands
  • Troubleshooting

Requirements

For this post, I'll ask you to make sure that you have the following requirements installed:
Linux users should be able to follow along assuming they have .NET Core and Docker installed. Podman, a very competent alternative to Docker should work too.

Containers in .NET world

So what's the state of containers in the ASP.NET world? Microsoft started late on the game but since .NET Core 2.2 we started seeing steady increases in container adoption. The ecosystem also matured. If you look at their official ASP.NET sample app on GitHub, you'll can now run your images on Debian (default), Alpine, Ubuntu and Windows Nano Server.

Describing our Project

The version we'll use (3.1) is the latest LTS before .NET Framework and .NET Core merge as .NET 5. That's excellent news for slower teams as they'll be able to catch up. However, don't sit and wait, it's worth understanding how containers, microservices and orchestration technologies work so you're able to help your team in the future.

For our project we'll use two images: the official .NET Core 3.1 SDK to build our project and the official ASP.NET Core 3.1 to run it. As always, our project will be a simple ASP.NET MVC Core web app scaffolded from the dotnet CLI.

Downloading the .NET Core Docker SDK

This step is optional but if you're super excited and want to get your hands in the code already, consider running the below command. Docker will pull dotnet's Docker SDK and store on your local repository.
docker pull mcr.microsoft.com/dotnet/core/sdk:3.1

C:\src\>docker pull mcr.microsoft.com/dotnet/core/sdk:3.1
3.1: Pulling from dotnet/core/aspnet
c499e6d256d6: Pull complete
251bcd0af921: Pull complete
852994ba072a: Pull complete
f64c6405f94b: Pull complete
9347e53e1c3a: Pull complete
Digest: sha256:31355469835e6df7538dbf5a4100c095338b51cbe52154aa23ae79d87585d404
Status: Downloaded newer image for mcr.microsoft.com/dotnet/core/aspnet:3.1
mcr.microsoft.com/dotnet/core/aspnet:3.1
This is a good test to see if your Docker Desktop is correctly installed. As we'll see when we build our image, Docker skips repulling the image from the remote host if it exists locally so we aren't losing anything in doing that now.

To confirm our image sits in our local repo, run:
docker image ls
You should see the image in your local repo as:
Why do I have 3 dotnet images? Because I used them before. At the end of this posts you should have two of them. Guess which?

Creating our App

Let's now create our app. As always, we'll use the dotnet CLI, let's leave the Visual Studio tutorials to Microsoft, shall we? Open a terminal, navigate to your projects folder and create a root folder for our project. For example c:\src\webapp. Open a terminal, cd into that folder and type:
C:\src>dotnet new mvc -o webapp

The template "ASP.NET Core Web App (Model-View-Controller)" was created successfully.
This template contains technologies from parties other than Microsoft, see https://aka.ms/aspnetcore/3.1-third-party-notices for details.

Processing post-creation actions...
Running 'dotnet restore' on webapp.csproj...
  Restore completed in 123.55 ms for C:\src\webapp\webapp.csproj.

Restore succeeded.
Now let's test our project to see if it runs okay by running:
cd webapp
dotnet run

C:\src\webapp>dotnet run
info: Microsoft.Hosting.Lifetime[0]
      Now listening on: https://localhost:5001
info: Microsoft.Hosting.Lifetime[0]
      Now listening on: http://localhost:5000
info: Microsoft.Hosting.Lifetime[0]
      Application started. Press Ctrl+C to shut down.
info: Microsoft.Hosting.Lifetime[0]
      Hosting environment: Development
info: Microsoft.Hosting.Lifetime[0]
      Content root path: C:\src\webapp

Open https://localhost:5001/, and confirm your webapp is similar to:

Containerizing our web application

Let's now containerize our application. Learning this is a required step for those looking to get into microservices. Since containers are the new deployment unit it's also important to know that we can encapsulate our builds inside Docker images and wrap everything on a Docker file.

Creating our first Dockerfile

A Dockerfile is the standard used by Docker (and OCI-containers) to perform tasks to build images. Think of it as a script containing a series of operations (and configurations) Docker will use. Since our super-simple web app does not require much, our Dockerfile can be as simple as:
# builds our image using dotnet's sdk
FROM mcr.microsoft.com/dotnet/core/sdk:3.1 AS build
WORKDIR /source
COPY . ./webapp/
WORKDIR /source/webapp
RUN dotnet restore
RUN dotnet publish -c release -o /app --no-restore

# runs it using aspnet runtime
FROM mcr.microsoft.com/dotnet/core/aspnet:3.1
WORKDIR /app
COPY --from=build /app ./
ENTRYPOINT ["dotnet", "webapp.dll"]
Why combine instructions?

Remember that Docker images are built using common layers and each command run will be ran on top of the previous one. The way we script our Dockerfiles affects how our images are built as each instruction will produce a new layer. In order to optimize our images, we should combine our instructions whenever possible. 

Building our first image

Save the contents above as a file named Dockerfile on the root folder of your project (on the path above to where your csproj exists, on my case c:\src\webapp\Dockerfile) and run:
C:\src\webapp>docker build . -t webapp

Sending build context to Docker daemon  4.391MB
Step 1/10 : FROM mcr.microsoft.com/dotnet/core/sdk:3.1 AS build
 ---> fc3ec13a2fac
Step 2/10 : WORKDIR /source
 ---> Using cache
 ---> 18ca54a5c786
Step 3/10 : COPY . ./webapp/
 ---> 847771670d86
Step 4/10 : WORKDIR /source/webapp
 ---> Running in 2b0a1800223e
Removing intermediate container 2b0a1800223e
 ---> fb80acdfe165
Step 5/10 : RUN dotnet restore
 ---> Running in cc08422b2031
  Restore completed in 145.41 ms for /source/webapp/webapp.csproj.
Removing intermediate container cc08422b2031
 ---> a9be4b61c2e6
Step 6/10 : RUN dotnet publish -c release -o /app --no-restore
 ---> Running in 8c2e6f280cb9
Microsoft (R) Build Engine version 16.5.0+d4cbfca49 for .NET Core
Copyright (C) Microsoft Corporation. All rights reserved.

  webapp -> /source/webapp/bin/release/netcoreapp3.1/webapp.dll
  webapp -> /source/webapp/bin/release/netcoreapp3.1/webapp.Views.dll
  webapp -> /app/
Removing intermediate container 8c2e6f280cb9
 ---> ceda76392fe7
Step 7/10 : FROM mcr.microsoft.com/dotnet/core/aspnet:3.1
 ---> c819eb4381e7
Step 8/10 : WORKDIR /app
 ---> Using cache
 ---> 4f0b0bc1c33b
Step 9/10 : COPY --from=build /app ./
 ---> 26e01e88847d
Step 10/10 : ENTRYPOINT ["dotnet", "webapp.dll"]
 ---> Running in 785f438df24c
Removing intermediate container 785f438df24c
 ---> 5e374df44a83
Successfully built 5e374df44a83
Successfully tagged webapp:latest
If your build worked, run docker image ls and you should see your image webapp listed as an image by Docker:
Remember the -t flag on the docker build command above? It told Docker to tag our own image as webapp. That way, we can use it intuitively instead of relying on its ID. We'll see next.

Running our image

Okay, now the grand moment! Run it with the command below in bold, we'll explain the details later:
C:\src\webapp>docker run --rm -it -p 8000:80 webapp
warn: Microsoft.AspNetCore.DataProtection.Repositories.FileSystemXmlRepository[60]
      Storing keys in a directory '/root/.aspnet/DataProtection-Keys' that may not be persisted outside of the container. Protected data will be unavailable when container is destroyed.
warn: Microsoft.AspNetCore.DataProtection.KeyManagement.XmlKeyManager[35]
      No XML encryptor configured. Key {a0030860-1697-4e01-9c32-8d553862041a} may be persisted to storage in unencrypted form.
info: Microsoft.Hosting.Lifetime[0]
      Now listening on: http://[::]:80
info: Microsoft.Hosting.Lifetime[0]
      Application started. Press Ctrl+C to shut down.
info: Microsoft.Hosting.Lifetime[0]
      Hosting environment: Production
info: Microsoft.Hosting.Lifetime[0]
      Content root path: /app
Point your browser to http://localhost:8000, you should be able to view our containerized website similar to:

Reviewing what we did

Let's now recap and understand what we did so far. I intentionally left this to the end as most people would like to see the thing running and play a little with the commands before they get to the theory.

Our website

Hope there isn't anything extraordinary there. We essentially scaffolded an ASP.NET Core MVC project using the CLI. The only point of confusion could be the location of the project and the location of the Docker file. Assuming all your projects sit on c:\src on your workstation, your should have:
  • c:\src\webapp: the root for our project and our ASP.NET Core MVC website
  • c:\src\webapp\Dockerfile: the location for our Dockerfile

Dockerfile

When we built our Dockerfile you may have realized that we utilized two images (the SDK and the ASP.NET image). Despite this being a little less intuitive for beginners, it's actually a good practice as our images will be smaller in size and have less deployed code making them more secure as we're reducing the attack surface. The commands we used today were:
  • FROM <src>: tells Docker that to pull the base image needed by our image. The SDK image contains the tools necessary to build our project and the ASP.NET image to run it.
  • COPY .: copies the contents of the current directory to the specified inside the container.
  • RUN <cmd>: runs a command inside the container.
  • WORKDIR <path>: set the working directory for subsequent instructions and also as startup location for the container itself.
  • ENTRYPOINT [arg1, arg2, argN]: specifies the command to execute when the container starts up in an array format. In our case, we're running dotnet webapp.dl on the container as we would do to run our published website outside of it.

Docker Build

Next let's review what the command docker build . -t webapp means:
  • docker build .: tells Docker to to build our image based on the contents of the current folder (.). This command also accepts an optional Dockerfile which we didn't provide on this case. When not provided, Docker expects a Dockerfile on the current folder which you copied and pasted before running this command.
  • -t webapp: tag the image as webapp so we can run commands using this friendly name

Docker Run

To finish, let's understand what docker run --rm -it -p 8000:80 webapp means:
  • docker run: runs an instance of an image (a container);
  • --rm: remove the image just after it finishes. We did this to not pollute your local environment as you'll probably run this command multiple times and each run will produce a new container. Note that you should only use this in development as Docker won't preserve the logs for the image after it's deleted;
  • --it: keep it running attached to the terminal so we can see the logs and cancel it with Ctrl-C;
  • -p 8000:80: expose the container's port 80 on the localhost at port 8000. Is that port used? Feel free to change the number before the : to something that makes sense to you, just remember to point your browser correctly to the new port.
  • webapp: the tag of our image

Troubleshooting

So, it may be possible that you couldn't complete your tutorial. Here's some tips that may help.

Check your Dockerfile

The syntax for the Dockerfile is very specific. Make sure you copied the file correctly and your names/folders match mine. Also make sure you saved your Dockerfile on the root of your project (or, in the same folder as your csproj) and that you ran docker build from the same folder.

Run interactively

In the beginning, always run the container interactively by using the -it syntax as below. After you get comfortable with the Docker CLI, you'll probably want to run them in detached mode (-d).
docker run --rm -it --name w1 webapp

List your images

Did you make sure your image was correctly built? Do you see webapp when you run:
docker image ls
You can also list your images with docker images however, I prefer the above format as all other commands follow that pattern, regardless of the resource you're managing.

List the containers

If you ran your container, Did you make sure your image was correctly built? Do you see webapp when you run:
docker container ls

Use HTTP and not HTTPS

Make sure that you point your browser to http://localhost:8000 (and not https). Some browsers are picky today with HTTP but it's what works on this example.

Check for the correct port

Are you pointing to the correct url. The -p 8000:80 param specified previously tells Docker to expose the container's port 80 on our host at 8000.

Search your container

It's possible that your container failed. To list all containers that ran previously, type:
docker container ls -a

Inspect container information

To inspect the metadata for your container type the command below adding your container id/name. This command is worth exploring as it will teach you a lot about the internals of the image.
docker container inspect <containerid>

Removing containers

If you want to get rid of the containers, run:
docker container prune -f

Removing Images

If you want to get rid of the containers, run:
docker image rm <imageid>

Check the logs

If you managed to create the image and run it, you could check the logs with:
docker container logs <container-id>

Log into your container

You could even log into your container and if you know some Linux, validate if the image contains what you expect. The command to connect to a running container is:
docker exec -it <containerid> bash

Install tools on your container

You could even install some tools on your container. For Debian (the default image), the most essential tools (and their packages) I needed were:
    • ps: apt install procps
    • netstat: apt install net-tools
    • ping: apt install iputils-ping
    • ip: apt install iproute2
    Don't forget to run apt update to update your local cache of files else the commands above won't work.

    Conclusion

    On this post we reviewed how to create an ASP.NET Core website with Docker. Docker is a very mature technology and essential for those looking into transitioning their platforms into microservices.

    Source Code

    As always, the source code for this article is available on GitHub.

    References

    See Also

    Monday, June 29, 2020

    How to create a custom CentOS Stream VM on Azure

    There isn't a one-click experience for creating CentOS VMs in Azure. Learn how to create yours.
    Photo by Robert Eklund on Unsplash

    Running CentOS on Azure is great. However, getting there requires some work because none of the on Azure are available at the moment are free. On this post we will continue illustrating why one should use CentOS by deploying our own CentOS Stream VM to Azure.

    With the news that Red Hat is shutting down the CentOS project, I definitely cannot recommend CentOS for your server anymore. 😌 However, it still has its value if you're developing for RHEL.

    Azure Requirements

    Before getting our hands dirty let's review requirements to run a custom VM on Azure:
    • Disk format: at the moment, only fixed VHD is supported;
    • Gen: Azure supports Gen1 (BIOS boot) & Gen2 (UEFI boot) Virtual machines. Gen1 worked better for me;
    • Disk Space: Minimum 7Gb of disk space;
    • Partitioning: Use default partitions instead of LVM or raid;
    • Swap: Swap should be disabled as Azure does not support a swap partition on the OS disk;
    • Virtual Size: All VHDs on Azure must have a virtual size aligned to 1 MB;
    • Supported formats: XFS is now the default file system but ext4 is still supported.

    Installing CentOS on Hyper-V

    The first thing that we have to do is to produce a virtual hard disk (VHD) with a bootable CentOS installed using Hyper-V as explained in detail on a previous post. Today we'll extend that setup adding what's necessary to run it on Azure. On this tutorial we will:
    1. Download the CentOS 8 Stream ISO
    2. Create a virtual hard disk (VHD) in Hyper-V
    3. Create and configure the VM in Hyper-V
    4. Install CentOS on the VM by:
      1. Specifying a software selection
      2. Configuring networking (we'll need to install software after the first boot)
      3. Configuring partitions on disk
      4. Creating accounts
      5. Modify the system to add settings required by Azure

    Downloading the CentOS 8 ISO

    This should be obvious to most people. In order to get our custom installed on a VHD with Hyper-V, please go ahead and download the latest ISO to your computer. We'll need that ISO to load the installer and install it to our VHD. As previously, we'll use CentOS Stream.

    Creating a Virtual Hard Disk (VHD)

    With the ISO downloaded, let's create a virtual hard disk (VHD) on Hyper-V. To do so, open Hyper-V Manager, click New -> Hard Disk and choose VHD on the Choose Disk Format screen:
    Next, on Choose Disk Type, choose Fixed size:
    In Configure Disk, set the disk size. In my tests, 6GB was a reasonable size for a simple server and enough space on the home partition:

    Creating the VM

    The process to create the Hyper-V VM remains the same. Make sure to review the previous post it in detail as I'll only describe the essential bits that required by the Azure customization here.

    Configuring Networking

    Make sure that you choose the Default Switch in Configure Networking:

    Connecting the Virtual Hard Disk

    On Connect Virtual Hard Disk, we'll choose Use an existing virtual hard disk and point it to the one you just created. This is necessary because Hyper-V auto-creates VHDXs by default while Azure requires VHDs:
    To finish up, validate on Summary that all looks good and confirm:
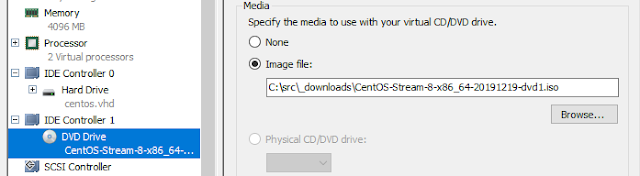
    Specifying the ISO

    The last thing before starting up the VM is to specify the ISO as a DVD drive. That's done on Hyper-V manager by selecting DVD Drive -> Media, choosing Image file and locating yours on disk:
    I also like to disable checkpoints and unset automatic start/stop actions.

    Installing CentOS Stream

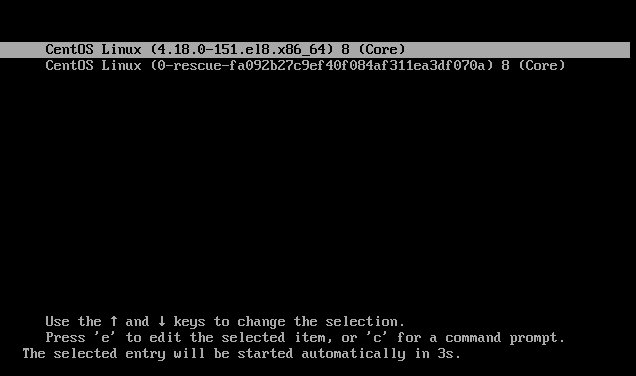
    After starting the VM in Hyper-V, you should be prompted with the screen below. Choose Install CentOS Stream 8-stream:

    The installer

    After the boot ends, you should be running the installer called Anaconda. Choose your language and click Continue:

    Installation Summary

    On Installation Summary, we'll essentially configure software selection, network. We'll also need to setup partitions on the Installation Destination screen.

    Software selection

    For the software selection, we'll go with Minimal Install as I don't want to delay the process by installing what we don't need. The only requirement we'll need to install is a text editor (I'll be using Vim, my favourite text editor but feel free to use yours) so we can make the necessary changes.

    During installation, click on Software Selection and choose Minimal Install:

    Disk Partitioning

    Because Azure requires some special settings (see requirements above), we'll need to do manual partitioning. But don't be scared, that shouldn't be complicated. We'll divide our disk in three main partitions:
    • /boot, 300Mb - where the boot files will be placed (including the kernel)
    • /, 4Gb - where all the files of the system will be placed (including software, logs, services and libraries)
    • /home, 1Gb - to store user files
    • no swap - we don't need a swap partition as Azure will privision one for us.
    We'll also use XFS whenever applicable since it's the default in Azure now.

    Choose your disk and click on Custom:
     On the Manual Partitioning screen, click on Standard Partition:
    Add the manual partitions by clicking on the + sign below.
     The first to add is /boot. Enter 300m on the popup so you see:
    Add 1GB for /home:
    And the remainder (4.7G) for /:
    Confirm to complete:

    Networking

    Enable networking as we'll need to install our text editor (and if you wish, update the instance before uploading to Azure):

    Start Installation

    After all the settings were entered, click continue to proceed. During install, you will be prompted with a screen similar to:
    It's recommended to set a root password and to create an account. I also recommend checking the Make this user administrator option as we should be using root as little as possible:

    Before the first boot

    Once the installation finishes eject the virtual ISO by goint to Hyper-V manager, choosing your VM -> Settings -> DVD Drive and set it to None -> Apply:

    First Boot

    After ejecting the DVD and starting the VM you should see the following boot loader:
    Then the following login screen after the boot finishes:

    Azure Configuration

    We'll now proceed with our Azure configuration. For CentOS 8, the documentation is specified here (although in less detail than on this blog post). Login as root and follow the next steps.

    Testing the network

    If you recall, we chose Minimum Install during the installation. That means that we don't have a text editor yet so let's proceeed with the installation as we'll need one to modify our configuration. To confirm our network can access the internet, type:
    ping github.com

    No network?

    If no network is available, check the status of your connection with:
    nmcli con status
    If eth0 is down, we should enable eth0 to auto-get an ip from our Hyper-V Virtual switch with:
    nmcli con up eth0
    Try pinging again and it should work fine now.
    ping github.com

    Installing Vim

    For editing files I'll install Vim, my favourite text editor. That can be done with:
    dnf install vim

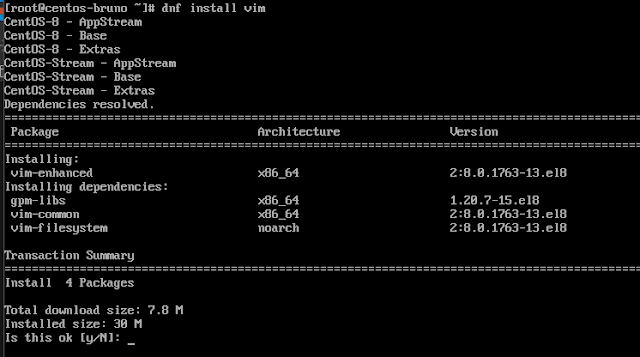
    Whenever possible, I'll be using DNF as it's what I'm used as a Fedora user. Feel free to use Yum if you prefer it.

    Configuring the network

    To configure the network, the first step is to create or edit the file /etc/sysconfig/network and add the following:
    NETWORKING=yes
    HOSTNAME=localhost.localdomain
    You can run this as a oneliner with:
    printf "NETWORKING=yes\nHOSTNAME=localhost.localdomain\n" >> /etc/sysconfig/network

    Create or edit the file /etc/sysconfig/network-scripts/ifcfg-eth0 and add the following text:
    DEVICE=eth0
    ONBOOT=yes
    BOOTPROTO=dhcp
    TYPE=Ethernet
    USERCTL=no
    PEERDNS=yes
    IPV6INIT=no
    NM_CONTROLLED=no
    Modify udev rules to avoid generating static rules for the Ethernet interface(s). These rules can cause problems when cloning a virtual machine in Microsoft Azure or Hyper-V:
    ln -s /dev/null /etc/udev/rules.d/75-persistent-net-generator.rules

    Modifying GRUB

    Next, we'll modify the kernel boot line in your grub configuration to include additional kernel parameters for Azure. To do this, open /etc/default/grub and set GRUB_CMDLINE_LINUX to:
    GRUB_CMDLINE_LINUX="rootdelay=300 console=ttyS0 earlyprintk=ttyS0 net.ifnames=0"
    Rebuild the grub configuration:
    grub2-mkconfig -o /boot/grub2/grub.cfg

    Installing the Azure Linux Client

    We'll now install the Azure Linux Client. This package is required by Azure to perform essential tasks on our VM including provisioning, networking, user management, ssh, swap, diagnostics, etc. Installing it on CentOS is super simple as the package is available in the repo:
    dnf install WALinuxAgent
    Then modify /etc/waagent.conf making sure you have:
    ResourceDisk.Format=y
    ResourceDisk.Filesystem=ext4
    ResourceDisk.MountPoint=/mnt/resource
    ResourceDisk.EnableSwap=y
    ResourceDisk.SwapSizeMB=4096    ## setting swap to 4Gb
    To finish off, enable it on boot with:
    systemctl enable waagent

    Deprovisioning and powering off

    Almost there. Just run the following commands to deprovision the virtual machine and prepare it for Azure with:
    waagent -force -deprovision
    export HISTSIZE=010i
    systemclt poweroff
    The machine will shut down. Let's move to the Azure part now.

    Uploading virtual hard disk to Azure

    Now that our setup is complete, we'll upload our VHD to Azure so we can create new virtual machines from it. There are two ways to do this:
    1. using AzCopy (only for the brave)
    2. use Azure Storage Explorer (recommended)
    Unfortunately I can't recommend using AzCopy at the moment as the tool is full of bugs. It could be that Microsoft is still learning Go 😉.

    Uploading using AzCopy (only for the brave)

    To upload our VHD, you should install AzCopy and install the Azure CLI. After the installations finish, close and open all PowerShell/terminal windows so all the env vars are reloaded.

    Login in Azure using the CLI

    Let's login to the Azure CLI by typing on a PowerShell window:
    az login

    Create the disk

    In order to create our managed disk, first we need to determine it's actual size. To get your disk size, type the command below and copy the output as will be necessary by the upload:
    wc -c <file.vhd>
    Now, run a command similar to the below replacing items in <> with your data:
    az disk create -n <disk-name> -g <resourcegroup> -l <region> --for-upload --upload-size-bytes <your-vhd-size> --sku standard_lrs
    To upload, first we'll need to generate a SAS token with:
    az disk grant-access -n <disk-name> -g <resourcegroup> --access-level Write --duration-in-seconds 86400
    If you got a json response with a "accessSas" token on it, copy that url. We'll use it to upload our VHD file to Azure using the azcopy tool:
    azCopy copy "<path-to-vhd>" "<sas-token>" --blob-type PageBlob
    After the upload is complete, and you no longer need to write any more data to the disk, revoke the SAS. Revoking the SAS will change the state of the managed disk and allow you to attach the disk to a VM.
    az disk revoke-access -n <disk-name> -g <resourcegroup>

    Option 2 (Recommended): Using Azure Storage Explorer

    I usually don't recommend GUIs but AzCopy is unusable at the moment. Also uploading via Azure Storage Explorer was way faster and didn't timeout on me 😒. So install Azure Storage Explorer, open a Blob container, find or create a folder and click Upload File. Select your VHD and don't forget to set it to Page Blob:
    After completed, you should see your VHD on your remove blog storage folder:
    Right-click it -> properties on your disk and copy the Uri:
    Next, run the following command to create a VHD from that image (it should be quick):
    az disk create -n <disk-name> -g <resourcegroup> -l <region> --source <your-vhd-url>
    At this point our disk should be recognized by Azure:

    Creating the VM

    With the disk available, we're ready to create our VM with:
    az vm create -g <resourcegroup> -l <region> --name <vmname> --os-type linux --attach-os-disk <disk-name>

    You should now see your VM on Azure as expected:
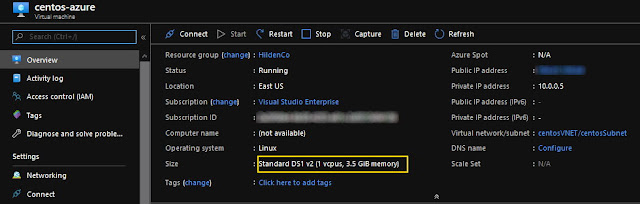
    Testing the VM

    Now the fun part, let's see if this works. If you look carefully the image above, you'll see our IP listed there. We can try to ssh into it with:
    ssh bruno@<ip>

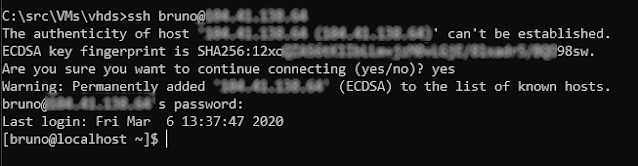
    Yay! Our custom CentOS VM is available on Azure and we can access remotely. From here, it's up to you to install the serices you need. Or, just play a little with it, tear it down, recreate and so on.

    Security Considerations

    I dream of the day we no longer have to discuss hardening our VMs on public cloud providers. Unfortunately we're not there yet. There's a lot of bots scanning for open ports and vulnerabilities on public IPs so make sure you take the necessary precautions to secure your SSH service such as preventing root login, changing the SSH port number and even banning failed login attempts.

    There's also some other measures that we can take on Azure to block that traffic but that's beyond the scope of this post.

    Troubleshooting

    Before wrapping up, I'd like to leave a few tips. It's important to remember that a lot can go wrong here. So far we created a virtual machine on Hyper-V locally, modified the configuration, uploaded our VHD to a blob storage and ran some commands using the Azure CLI to create our resourses on Azure. What else could go wrong? Let's see next.

    What's my public ip?

    You can get that information on the overview or, from the shell with:
    curl ipinfo.me

    Can't access the VM via SSH

    I had this error too. There are two possible problems: (1) your VM is not accessing the internet or (2) either a firewall or Azure's Networking is not properly set. Both should be fine if it's your first time accessing your VM.

    The VM isn't starting up

    Recheck the steps above. A solution would be running it locally from Hyper-V and make sure you didn't break it while applying the configuration.

    Can't access the internet

    This error may happen if your VM is incorrectly configured or if it couldn't get an IP from Azure's DHCP server. Try accessing it from the Serial Console to get insights about the eth0 ethernet adapter, IP and connection status with:
    ip a                                        # check my adapters. Expected: eth0
    nmcli device show eth0        # shows the status of the ethernet connection
    nmcli con up eth0                 # starts the connection

    The VM won't get an IP

    This is probably Azure's fault as the IP should be auto-given to you by their DHCP servers. Anyhow, we can retry being assigned an ip with:
    sudo dhclient

    waagent is not working

    Using the Serial Console, check if the agent is working and the status is active (running) with the command below:
    sudo systemctl status waagent
    sudo systemctl start waagent

    Can't connect to my VM via SSH

    This could happen if your instance can't access the internet or if the service is not running. Try connecting to it via the Azure Serial Client and check the previous steps to make sure that the VM can ping an external site. Also confirm that your public IP is correct. If you did not specify, Azure will release your previous IPs and is not guaranteed that a new one will be the same.

    Virtual routing problems

    If you think that the problem is related to virtual network routing in Azure, please check these links:

    Conclusion

    On this post we reviewed in detail how to create a custom CentOS Stream image and run it on Azure. For this demo we used CentOS, my favorite distro for the server but most of the information described here should also be useful for other distributions. We also demoed how to use the Azure CLI and showed some of the features Azure provides to us.

    References

    See Also

    About the Author

    Bruno Hildenbrand      
    Principal Architect, HildenCo Solutions.